Thursday, August 22, 2013

DIY pinch pleated drapes

Today was the first time I took a real stab at doing pinched pleated drapes. I scored some super clearance fabric at Joanns the other day. Its a white and pink damask pattern. Its not really my cup of tea for the design but I figured what the heck... its so cheap and I needed to practice making drapes. I got six yards of the fabric for only $12. Its a fairly thick outdoor/indoor canvas like fabric so I knew it was a good price. I might put it in Emily's big girl playroom.


Heres a very bad picture of my DIY curtains/drapes take 1. 


I think I did okay for a first timer. I'll be back on Monday to do a quick tutorial on how I made these without anything extra. Just fabric and a sewing machine. I am cooking up a plan to hang these with just a regular plain curtain rod.

Monday, August 19, 2013

Formal living room

Sorry no new projects today but I was able to take more pictures of our formal living room to share. Its a room that I have ignored for way too long. It doesn't get much love around here because we really never go there. Thus far I've done a mini sofa makeover, refinished two used captain chairs, and a quick coffee table makeover. The captain chairs were an impulsive purchase a while back for $20. I figured I needed extra seating and those chairs fit the budget so I picked them up at a local yard sale in upland. I refinished them to a dark espresso color to match our sofa and china cabinet. They will do while I search for a better replacement. I'm really looking for nicer armchairs but they can get pretty pricey.  Well enough gibberish and onto pictures.


Pillows were stolen from the living room. I still haven't decided on what pillows I want. 


Here's a shot of my DIY chair cover. A lot of people wonder how I can keep our chairs so white and clean.. the secret is they are removable and therefore washable. They aren't perfect but they are good enough for me. My old chairs were pretty ugly so anything is considered an upgrade.


Our formal space is a work in progress but its slowly coming along. I still need a new rug for the living space, new arm chairs, new pillows for the sofa, and refinish the side table.

Sunday, August 18, 2013

Pillow cover overhaul

This morning I worked on pillows throughout our house. I made a total of nine pillow covers using our existing pillows.

Here's a quick tutorial for anyone who doesn't know how to make pillow covers.

1. Cut out two pieces of fabric. I cut out four pieces total because I was making two at once. I made two lumbar pillows therefore I cut out four rectangle pieces. I wanted to save fabric so I made the back plain white so the bottom two pieces are just plain white.


2. Sew them shut on three and a half sides. Make sure you sew them inside out so you can flip them after. 


3. Stuff with foam/cushion or whatever you want and sew the last half side shut.


Here they are after on our dining room arm chairs. 


Although I really meant to save money by making the back plain white, I am glad that went that route. The plain white back looks really nice and makes the pillow feel more high end.


I also made two larger pillows for our plain chairs in the formal living room. I feel that our formal living room is lacking in a lot of areas and they don't really match but the pillows tie them in a little better. I made four pillows out of one yard of fabric. This black and white fabric was purchased at Joanns a while back. I really like it because its indoor/outdoor fabric which translates to toddler proof to me. 


I also bought blue fabric along with the black and white fabric and made two more blue pillow covers for our living room. Currently, our poor living room only has two good pillows and the rest are ugly and need a makeover. 


Lastly I made three more pillows for Emily's big girl playroom. Her playroom was really what got me to start giving our pillows a makeover. I purchased a yard of plain pink fabric and another yard of decorative pink/white fabric. Total cost was $6 since they were both on sale.  The smaller pink and white pillow is really cute it says I love mommy and I love daddy.

*edit: I just realized that Emily's big girl daybed cost a total of $31 to make. Bed itself was made by my dad from left over wood/mdf he had laying around, $6 for three pillows, $25 for pink and white fabric (two yards of each color totaling four yards). I'm quite happy with the bed because the Dorel daybed that we returned cost over $100 by itself not including covers/decoratings/mattress. But of course this custom made bed is only half the size of the dorel bed.


 If I remember correctly total cost for all the fabric was $18. All were purchased at Joanns while they were 50% off. That averages out to be $2 a pillow and I still have fabric for more pillows if I really wanted more of the pillow covers. Not too shabby considering the average cost for pretty pillows range about $20 a piece.

Tip: You can save more money by going to the outdoor swap meet on Mission and Ramona. They have a good variety of fabric for very affordable prices. Prices are at least half less compared to Joanns. I haven't gone there lately because its too hot and I like to take my time looking for pretty fabric so Joanns is more convenient for me. I'm planning to go there next friday (8/30) if anyone wants to join me. I'm in the search for new drapes.


Friday, August 16, 2013

The daybed take 2

Recently I purchased a dorel daybed from Walmart. I was sad because quality was not great and it was way too big for Emily's big girl playroom. We wanted something for the kids and adults to lounge on and Emily to sleep on if she wanted. Since a standard size daybed was too big for the room we ended up having to build a custom size daybed. While working on our fireplace, I asked my dad to build us a simple daybed with some of the left over wood/MDF from the fireplace project. Supplies for the daybed were free because my dad already had all the wood that we needed.

A long time ago we had purchased a fold-o-mat from Walmart for $39. We I thought it was a good deal because I can always lay it out and lay on the floor with it. The foam in itself probably cost more then $39 if we were to buy it separately so I was sold that it was a good price. We really have used it a lot. When Emily was a baby we would lay the mat out and let her crawl around on the floor. We washed the cover so much that the zipper broke so we had to throw away the cover. I was so sad. The mat was still usable but got really dirty and collected a lot of hair. The only way to use it was to lay a flat sheet over it but it looked messy, so off to the storage closet it went. I knew in the back of my head that one day I will put the foam to good use.


I asked my dad to build me a simple storage daybed similar to this


but when I came back from grocery shopping he built me something totally different. Oh wells, thats what I get for leaving my dad unsupervised. 


Here is the new perfect sized daybed with our old foam. I only had to use one foam mat so I still have two more mats left. I'm not sure what I'm planning to do with it yet. Emily is already loving the new daybed. Her toys are already all over it. She even pretended to nap on it before I got a chance to make a cover for it.


Fast forward two months later, i've been dragging my feet to do anything due to a terrible thyroid flare up. I've been so exhausted for no apparent reason. I'm not sure if its because of the heat or my thyroid... or maybe its both. Regardless, today I was able to complete the cover for the daybed.


I bought two yards of white and green fabric at Joanns for $25. I just made a simple split cover for the bottom. Its great because I can hide more toys under the daybed. The white fabric is really cute. It has white plastic dots if you look closely. Its a fun twist to just plain white.


Remember that rug that I meant to return? I never got around to returning it. So I guess that means I'll have to keep it for now. Its ok... it was too much work to return it.

Be back on Sunday with more updates on pillows, decorations, and Emily's big girl playroom.


Monday, August 12, 2013

Estimates of master bathroom makeover

The last few days I've been researching the best way to remodel my bathroom on a budget. Currently, our master bathroom has marble tiled floors and granite countertop for the double sink. The sink cabinets were already painted white and its in near perfect condition. I really love the tiled floors but I'm not super fond of our granite countertop. When we first moved to our house, I hated our kitchen granite countertops but now I'm living in harmony with it so I'm hoping the same will happen with the bathroom countertops.

The plan for the master bathroom remodel (with budget prediction) include:

*framing out the two mirrors above the sink. (<$50) ***already done. I just need to write a post about it. Cost $30 to build wood frames around our mirrors.

* adding nice knobs to the cabinets (<$30)

*accessorize the area in between the two sinks and maybe hang something between the two mirrors (<$50)

* repaint the bathroom ($30)

* add tile to shower and add niche to store shampoo bottles (<$300)

* add accent glass tile to tub (<$50)

*add new frameless shower door ($600-1000) I might just use our basic door because I don't think it makes a significant difference for over $500. I've looked at model homes and they have the basic shower doors with nice tiles and it looks just as stunning.


Currently, I'm working on redoing the shower part with tile. I've come across some minor issues.

Estimates I have received from various plumbers/contractors/etc

1. I provide supplies/base and he will install new shower base $200. My dad will tile the shower and add the niche. Bad news is that our shower pan isn't standard. Its an odd size and I would have to custom order it. Custom ordered shower pan/tile base will cost around $600. Our tub will remain the basic builder grade acrylic tub and I would just have to build a wood tub surround for it.

2. $3,000-$4,500 contractor will do everything. They provide all supplies (shower base, tiles, niche, etc) I basically just pick the marble and they demolish my tub and shower. They will install new soaking tub with marble and glass accent surround to my liking and new marble shower. I will provide them with a new tub. This option isn't my first choice because my tub and shower will be all marble and not wood.

3. Last estimate was for the same contractor as number 2 but he will only build a wood base for the tub, install new tub with marble top and install only the base for the shower. My dad will tile the shower and add niche. Cost will range about $1,000-1,500. I will provide new tub for him to install.

All these estimates don't include the shower door. We would have to order a custom shower door or use our old one.


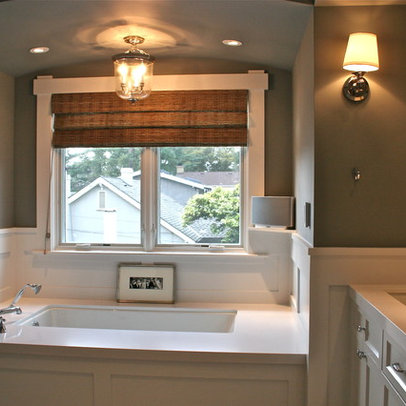
Currently I'm loving wood bases for the tub instead of the traditional marble/granite/tile surround. It so happens that a wood tub surround is cheaper than the marble tub which is better since I prefer the wood surround. I feel that a complete marble tub, marble shower, marble floors, and granite countertops will be too much stone for my bathroom. I like more texture and dimension or maybe I just naturally gravitate to cheaper styles. LOL Here are inspirations that I'm looking into. I really love white wood bases and plain white/marble tops for the tub.


Right now I'm thinking of going with option #3. Its the middle price and we would get a new tub and shower. I'm guessing if I went with that option, total cost for master bathroom makeover will range about $2,000 including new accessories/paint listed above. New soaking tub will cost about $100. I've looked at a few possible options. New faucets/shower heads would cost another $200 I'm hoping. $2,000 for a new master bathroom isn't too bad but nothings wrong with my current bathroom. Its just ugly, plain and basic. I can't seem to get over being wasteful.

Saturday, August 10, 2013

DIY flush mount album

Binh and I have been married since 2010. After our wedding, everything has been about Emily because  I found out I was pregnant two weeks later. Thinking back to our wedding, I realized how expensive weddings can get. Fortunately for us, we had a two year engagement so I was able to save money by DIY and buying big ticket items on clearance. Some of the DIY items include our centerpieces, invitations, dance floor, and now our official wedding album. After our wedding I ordered an album from Adormapix and was quite happy with their product. I ordered a 76 page 10x10 leather album for about $100. I made sure I waited until their albums were 40% off and scored a great deal. I really liked their album because it has nice and thick pages, they are lay flat pages, and were 10x10 which made it very easy to stick in my purse to show friends. Since there were so many pages, it consists of many pictures and really showcased our wedding in a storyline. However, it wasn't a flush mount album. I've searched for a long time and couldn't settle on an affordable option for flush mount albums.


Recently I came across Nations photo lab and it so happened that they had a 40% off sale on their flush mount albums. I ended up ordering a 12x12 leather flush mount album with 30 pages for $200 including no tax and shipping.  I designed the album myself using their basic uploader and it took me about five hours to complete. Overall I love the album. Its extremely heavy, with extra thick unbendable pages, and a basic leather cover. I usually like plain black leather for my albums because I feel that they are classier and won't look old over time.


It came in a very nice package that was easy to open and protected the album. Production and delivery of the album took almost a month but estimated times were given on their website so I was expecting it already. The album also came with a storage box. Its sturdy and plain. Its made of cardboard and just black. Its nothing fancy but it came with the album and it just so happens that I like it simple like that.


For some reason, I love the look of a plain black leather wedding album. I think it looks so classic. I use to like the albums with the acrylic covers of our images but overtime plain and black seems more classic  and less outdated. Plus it helps that its basic and always the cheapest option for flush mount albums.


The pages are extra thick with black and white edge and rounded corners.


Once opened to the first page its a black silk murray lining. 


Once opened the album is completely flat and there is no line in the middle. Photos came out very crisp and clear. 


After being married for almost three years, I feel that our wedding has become a very distant memory. It was a very joyous day for Binh and I and I have learned to showcase some of the memories in our bedroom. Since our whole house has been taken over by pictures of Emily, I feel that our bedroom is the only real place that we can have images of just us. Currently we have two framed pictures of Binh and I in our bedroom. The first one is located on the odd niche blogged about here and second picture is above Binh's nightstand of us and our DIY monogram dance floor. I had to take the picture at an odd angle due to a glare from an adjacent window. 


Anybody want to share how they have displayed images from their wedding in their home? 

Saturday, August 3, 2013

As close as it gets to Binh's office

I went missing for a few days because I've been busy with our pending master bathroom remodel. Sorry no new updates there.

I've had a few people ask about Binh's office/playroom/junk yard. The truth is..I'm scared to go in there. The last time I went in there.. I was terrified because I didn't have any space to move around and i'm quite claustrophobic. I've been nagging him to let me clean out his junk yard office but he won't let me. Someone... anyone with a heart.. please convince him to let me clean out his room.

The other day I posted about giving our entry way a makeover. Binh's office is located to the very left of our door so its part of the entry way. Since I can't show you his office, I've decided to give the outside of his office a makeover. I found a really simple and cute wall art to go on the right side of the french doors. I've never been a big fan of symmetry so I liked that its not perfectly symmetrical on both sides.

This is how the outside looked for a few days. I always like to tape up my possible art work to see if I like the size that I plan to hang up.


I went to Aarons brothers and bought three white picture frames for about $40. I can't remember where I saw the art work but I pretty much used Lavendaria (font) and typed Enjoy the little things. I got them printed out at Kinkos for under $4.


Here's a before and after for comparison. 


One more wall in the house is complete. Now I'm moving on to the next wall. :)