Thursday, May 29, 2014

Quick update..

I've been missing for the last two weeks. Today I finally have some new updates. Its much more difficult to find time to finish up DIY projects when you have two kids, especially when one feeds every 3 hours around the clock. But some good news, I've been able to squeeze in some mini projects between their two hour afternoon naps. I'll start blogging less now due to lack of time and energy plus once I start working again it will be even more difficult to do projects. Expect about one post a week in the future.

Anyways... moving on to my projects. Last time I posted some fun coral fabrics that I grabbed from Joanns to brighten up our living room sectional. I started off with these pillows. I somehow always end up slowly collecting random pillows. They don't match my decor so they all got a facelift. 


The red pillow from the bed in a bag in our guest room was the first to get a facelift. It was my first time  at attempting to do the greek key design. I didn't have ribbon so I used some blue fabric in place of ribbon. It came out okay but I wished I would have allowed more space on the edges. Whole project didn't cost me anything because I had all the fabric/supplies. The pillow went back into the guest bedroom. 


The other pillows got turned into this: 


I'm not sure what I want to do with the other left over pillows but these were the ones I was able to get to before my kids woke up. 

And.. the free desk that I got on CL for Binh's office got painted. I started off with the below picture. I used Kilz primer on the top of the table and on some of the bare particle wood that was showing on the bottom. I wanted to make sure the black paint would stick to the table.


Then I painted the whole thing with black paint in eggshell. Sorry the picture is pretty bad quality but thats the best I could do for now. I have no time to try to take better pictures. Kids are up and need my full attention.


Here are the sides and back on the table. 


This is the other side of the desk. I didn't have time to paint this but I plan to leave it in the original color because it will be facing the wall and no one will see it. If you notice, theres blue tape on the gap due to removal of the drawers. I needed a quick and easy solution so I just added painters tape to the other side and painted it over with black paint. Now you can't see the gap anymore from the front of the desk. I don't think anyone will really notice since a chair will be there most of the time and it will be facing the wall. 


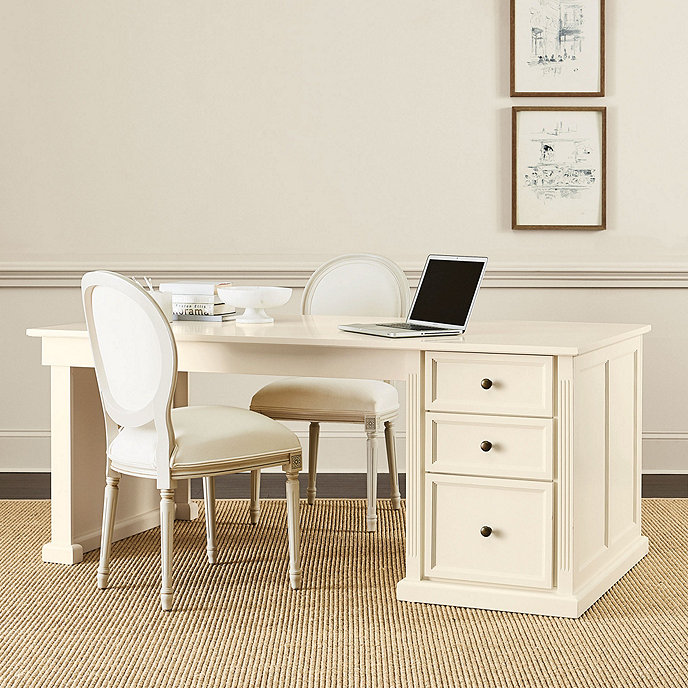
Heres my desk inspiration from Ballard designs for $1K. I'm hoping my finished product will look pretty close to this desk. 


I'll have Binh's old desk moved out by sometime next week. I'll be back to post more updated pictures of the finished office space. 

Thursday, May 15, 2014

Carseat accessories

A few days ago I mentioned I had a spare yard of fabric from Joanns. I plan to make a cute car seat cover and today while the kiddos were taking their routine afternoon nap I was able to make a simple carseat canopy and strap cover.


The other side of the canopy.


The carseat strap cover. I was really surprised that our carseat didn't come with basic strap covers. I ended up making matching ones for the carseat. I made it with extra cushion by using some small old hand towels.


Tutorial for simple carseat canopy: 


1. I started off with a yard of two different fabrics. 


2. I eyeballed to see how much fabric I wanted to have on our carseat. I ended up cutting a small strip off so I can make the strap cover and strings to hang the canopy.


3. I used a large plate to mark the corners. I wanted rounded corners. 


4. I trimmed both fabrics at the same time. I stitched them both together with the backsides facing outwards and leaving a small opening so I can flip the canopy over later. 


5. This is how it should look after being flipped over. Notice the small corner that is open. This is the opening I used to flip the whole canopy inside out. 


6. I was too lazy to iron the whole canopy so I made another stitch to flatten everything. At this point, it looked like a very fancy blanket. 


7. I cut out two smaller cubes for the strap cover from the extra strip of fabric from step 2. Set aside. 


8. Cut the fabric into two. 


9. Stitch together inside out and flip over. Finally attach it to the canopy. I just eyeballed it to avoid the carseat handle. 


Sorry no tutorial on how to make the strap cover. Its pretty straight forward and its attached via velcro. 


I spent a total of $24 to make the car seat canopy, strap cover, poncho nursing cover, and nursing pads. I added $4 to the total from the other day because of the polka dot fabric. Overall review of projects: I generally don't do small projects because its not really worth my time. I enjoyed doing these mini projects because I have a little bit of downtime when my kids are napping. Plus it makes me feel like i'm doing something special for my kids since its custom made by mommy.

I went to Joanns to pick up the light pink polka dot fabric and also picked up these three coral fabrics to decorate our sectional. Our living room has been neglected for way too long. The boring colors along with being stuck at home due to the humid weather is making me depressed. I got a yard each of the below fabric. Total for all four fabrics (including the pink polka dot fabric) were $20. They are all on sale.


Tuesday, May 13, 2014

Boobie accessories

I've been missing for the last two weeks because I've popped out a healthy baby girl. We've been home for about about a week now and I've just started to get my routine back. Newborn stage is really nice because all they do is eat, sleep, and poop. Kaley sleeps 90% of the day so i'm able to do about the same amount of work around the house.

Enough about updates, today I wanted to talk about women and our boobs. I've been very fortunate and have been able to successfully breastfeed Kaley thus far. Any woman who breastfeeds understands there are certain issues that come with breastfeeding. First issue, being discreet. I'm not talking about hiding out in the bathroom just to breastfeed (gross by the way) but keeping us mothers from doing a flash friday. I usually go to my own little corner or try to find a more discreet place to feed but I still feel the need to find a way to let others know i'm busy breastfeeding. The solution: HOOTER HIDERS. While recovering I made my own little "hooter hider." Its actually more of a poncho with velcro on the sides for easy access. I got two yards of fabric from Joanns.


I used one yard to make my poncho. The idea is pretty straight forward so I won't be doing a tutorial on it. I just hemmed the sides and cut out a large V for the neck opening. I'm pretty petite so one yard was good enough for me but I would recommend using 1.5 yards so its a little longer for women who are over 5'3. I like this poncho version over the traditional front cover only versions because I have more coverage on my torso from the back. Sometimes I have to pull up my shirt and a traditional front only nursing cover won't really work well for me. This poncho version ensures that all angles are covered. 


Heres the view of the velcro. I added the velcro for easy access. 


Second issue with breastfeeding... leaky boobies. Not quite the idea of a wet t shirt contest but you get the point. This time around, I opted to make my own washable nursing pads. I used the disposable nursing pads from all the brands possible with my first daughter but they all work about the same. Only solution is to replace them very often. I've looked into washable nursing pads and decided to make my own with an old towel and some cute nursery fabric. 


Steps are pretty easy. I used a template I made from cardboard and cut circles from the towel I had. I was planning to donate this white towel because it got discolored from being washed with new dark jeans. Nothing was wrong with the towel. I just didn't like the off white color. 


I stitched the towel right onto the uncut nursery fabric. I got a pack of 30 pieces of fabric from Joanns for $3-4 with a coupon. I left a small opening so I can flip the nursing pad over. Before flipping it over, I cut/trimmed the excessive fabric with scissors. The towel circle looks shaggy because I rewashed it before I stitched it together.


This is the trimmed version.


This is the final version. They aren't perfect but works well for me and was a simple, affordable, and fun project for me to do while my kids were taking a nap. I haven't finished making all 30 yet but I think I've completed about 20. I have plenty to use for now so I might just stop at 20.


I still have one more yard of the nursing cover fabric. I'm thinking of making a matching portable changing pad with some left over foam to put in my SUV for travel or else making a carseat cover. I'm leaning towards making a carseat cover similar to this with the remaining fabric.


Total cost for my poncho nursing cover and the nursing pads were $20 from Joanns with a 40% off coupon. Not a bad project considering most nursing covers cost at least $30.

Thursday, May 1, 2014

Last minute nesting updates

The last couple of days I've been preparing our home for Kaley's arrival. Two things that I'm excited to share are a free medella breast pump and scheduling a house cleaning service for post partum.

I'm surprised to know that many women are unaware of health plans covering breast pumps. I can't speak for other insurance companies but we have Anthem blue cross high option PPO and ordered a Medella double breast pump for free with no copay/deductible. Everyone who have bought a breast pump knows that these things are expensive and can range up to $300-400 for one. I did a quick search online and found Edgepark.com and filled out their online eligibility form. Whole process took me about five minutes. A few days later I got a call from one of their representatives confirming my order status. I was glad I didn't have to do a single thing. I actually didn't even pick up the call because I wasn't familiar with the number. Within a week, I got another automated confirmation call and email stating my tracking number for my order. The next day I received my Medella breast pump. I'm one happy girl and glad the whole process was super easy and stress free. I know Kaiser insurance does not cover breast pumps. They will only provide you with a manual breast pump unless you have a special prescription from your OB.

Here I present to you my free Medella Breast pump. I like it so far because its very portable and not bulky as I imagined. It arrived with a few free items such as bottles, nipples, and disposable pads. 


I've tried a few brands of breast pumps including Medella, lansinoh, and Evenflo. I can say I've tried the most expensive $1000+ (Medella symphony) and the more affordable brands (about $150). I was fortunate enough to exclusively breastfeed for ten months with my first child. So I hope by passing on this information, expectant mothers can all have the opportunity to order their breast pump for free or at least a reduced cost. It really doesn't hurt to fill out a five minute online form from Edgepark.


Second exciting update I wanted to share: I've booked my very first home cleaning service for post partum. I was really debating if I wanted to hire a cleaning service because I'm pretty picky and know that only I can clean the way I want. After much debate I booked Homejoy services for $49 for 3 hours of cleaning service. They had a special and I just happened to come across them. They are scheduled to come two days after my due date so I'm really hoping to just come home to a house I can still recognize.