Wednesday, December 24, 2014

DIY budget orb chandelier

Merry Christmas everyone! This whole week our family has been taking things very slow and just relaxing since hubby was off for the week. Our home has been decorated since mid November so it was really nice to just sit back and relax. All presents have been ordered online so all I had to do was wrap them. Aside from wishing everyone a blessed and Merry Christmas I wanted to share my DIY budget friendly orb chandelier tutorial. 

List of supplies: 
four hula hoops from Dollartree
strong tape such as packing tape 
ribbon or thin string
paint color of your choice
paint brush
chandelier of your choice 

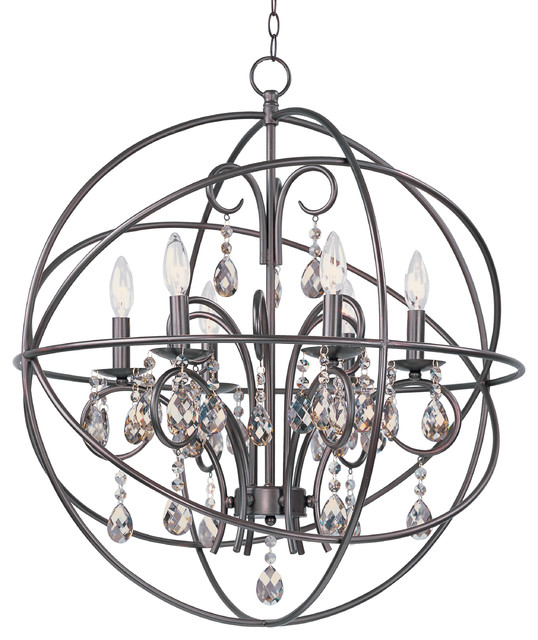
I bought my chandelier from Overstock a very long time ago using a coupon I had. I forgot how much my chandelier cost but around $50-60. During that time, I went to Belamaria Frontier homes in Ontario when they had their model home showing and saw a gorgeous orb chandelier in one of the models. 


I came home and couldn't stop thinking about it. I wanted to buy one for our bedroom because our bedroom was just so boring and in desperate need for some attention. I considered buying an orb chandelier but realized they just cost way too much. For a simple 20 inch orb chandelier I am looking at spending about $300. 

After bugging my father and father in law to install the chandelier for me this is what I got: 


I had a fan in place and my dad didn't know how to properly remove it so he needed his witty sidekick.. my father in law but low and behold.. he loves to cut corners so this is what I ended up with. Somehow between the two grown men they were convinced this is how a chandelier should look hanging.. with a huge gap, no chain, and stuck on the ceiling. So long story short my chandelier sat like that for a very long time. After the length adjustment, I was able to officially work on my orb chandelier. 

To get started I cut two hula hoops in half and taped them onto a third hula hoop. I had to play around with the hoops for a little bit before figuring out how to tape it so they would stay. I used packing tape since it was strong and taped the two open ends together leaving a small gap so I can insert the third hula hoop that was uncut. 


I tied my hula hoop onto the chandelier with some thin christmas ribbon I had laying around. 

Once attached to the chandelier I added the last hula hoop in the middle and tied it down with ribbon again.  Below is a close up picture of the bottom with unpainted clear packing tape and the white ribbon that ties the middle hula hoop to the other hula hoops. 


Here it is once again with a first coat of black paint. I painted the hula hoops before I hung them up so it would be easier to touch up the unpainted parts. Once the hula hoops are painted you can't really tell there's tape on them unless you look very close. The chandelier is hung pretty high and in the center of the room right under the foot of my bed so you have to stare at it to look for its flaws.


I repainted the whole chandelier twice to make sure I didn't miss any crevices. Here's how it looks in our unfinished bedroom. Pictures were also taken later on during the day so images aren't as clear. 


This is the view from my bathroom looking into our bedroom. Notice I recently just hung some ikea curtains on our window. 


This is how my room looks when you first enter. 


Ignore all of Kaley's temp bed and chair. It was a temporary solution until she was old enough to move out of our room. She's officially out now so we will be removing those soon. 

My DIY orb chandelier isn't perfect but it is good enough for our bedroom.  It was an easy, simple affordable upgrade to an other wise basic chandelier.  It sure makes me feel like our bedroom is one step closer to being complete. 


Monday, November 24, 2014

Greek key pillow review

Holiday season is coming up so I've been busy putting up decorations. Our Christmas decorations are officially up and almost done so the holidays is full blast at our house. Today I wanted to do a review about DIY greek key pillows.

Supplies: 

*two white old pillows that we already had and were using in our master bedroom. 

*1 yard of colored fabric, I used gray. If you are lazy you can just buy a roll of ribbon at the 99c store 
or Dollartree. For my standard king size pillow I used 3 yards of fabric/ribbon per a pillow cover. $3

*Thread the color of your ribbon/fabric. $0.79c

I went to Mylee fabric store in pomona on Holt to save money on fabric. 

Instructions 

I first started off with our regular white pillow covers. I didn't like them because the pillow cover was getting loose over time from being used. Plus I hated the open end pillow cover. It looks like this: 


I first cut them smaller and split the back in half and overlapped them by 3 inches. So the back piece I left as original length of pillow cover and cut in half and the front piece I cut off 3 inches so when I overlapped the back pieces they are the same size. 


But before I started sewing them together I did the greek key design first. I used this template for the design. I didn't use the exact same measurements because my pillow cover was a little longer. I used the  4" and 6" for the corners and just filled in the rest. 


Here's my pillow cover with the initial design marked using regular black pen. 


Then using an iron and some fabric I made my own ribbon. I didn't stitch anything. I simply just ironed a ribbon and started stitching the ribbon onto the pillow over. 


To do the the corners I followed this blogger. She did all kinds of fancy stuff like taping the ends, using no sew iron on hemming tape. I didn't do that. I just traced my design on and started sewing the ends. 

I have to admit my first pillow took what seems like FOREVER to finish. Forever to me is like 40 minutes. It was just so time consuming for me and time is what I don't have with two kids. As I was about to scrap the whole project I thought it through and decided I should finish off what I started since I will have one mismatched pillow cover. 

Fortunately, second and third pillows were much easier. Total time spent for second pillow was about 15 minutes. Here's how they look after I finished them. My sheets are wrinkly because we actually sleep in them. I haven't found a solution to keep my bed sheets super crisp and wrinkle free. 


Here's a sneak peek of my in progress project. I've been trying to finish up the orb chandelier in my room but haven't had the chance.  One day I'll blog about it.


I'm trying to do something similar to this using hoola hoops from Dollartree and a very small budget.


Our bedsheets were so plain before. They were just all white. I also only use five pillows for our bed because thats what we use. Our guest bedroom has more pillows because its more for decorations. 


I also made some more pillow covers for binh's office using some fabric I found at Mylee. 


Overall I would only do this project if you plan to make at least two pillow covers. The first one will be trial and error and take a lot of time trying to figure out how to do things. However, as mentioned earlier, second and third ones will be much faster. 

Saturday, October 25, 2014

I bit the bullet

Today I wanted to talk about baby food processors. With both of our kids, we've decided to make their baby food fresh everyday. I, like everyone else, saw those commercials about the Baby bullet and had to buy one. Back when I bought it, Emily was our first precious child so even though we knew we could buy a basic blender but the Baby Bullet seemed more fitting. It came with all the cute packagings and small containers and blah blah blah. Well, $50 later and full of regrets I'm here to report that the Baby Bullet is no bueno.


Issues I had with the Baby bullet:
* Its price. At $50 it wasn't so bad a price point for our child but for the quality its like highway robbery to me.
*Its hard to clean. On the rim of the bottom piece of the baby bullet, there is a plastic ring that is impossible to take out and clean every time. I discovered that MOLD can grow on there. Look it up for yourself from other parental complaints/reviews. Mines never got to that point because I was so paranoid with cleaning that stupid ring.
*It leaks. The bottom piece at the blender leaks black fluid which is beyond gross to me. Mines might have been a bad seal on the machine but regardless something like that should not have happened.

Today I took liberty and finally threw it out because I can't stand looking at it anymore. I ended up purchasing a $19 Hamilton Beach blender on sale at Target and hands down it beats the Baby bullet for days.


I ended up choosing this Hamilton beach for a few key reasons. First it was compact enough for Kaley's baby food. I liked the Baby bullet because I thought I didn't have to wash a big piece of machinery just to make three small containers of baby food. I usually make fresh baby food everyday or almost everyday, so a standard size blender is a little too big. The HB blender single canister serving container is the perfect size for 1-2 days worth of food for Kaley. Second, its simple to use. I've used other fancy blenders with an LED touchscreen monitor on it and 100 features for different blends and honestly, I don't really care for all that. I'm simple, I just need one on and off button. Third, its really easy to clean. The blender itself is only three pieces that I would have to wash. No hidden crevices like the baby bullet. No heavy glass canisters like some other fancy blenders.

However, the only thing I liked about the Baby bullet was that it came with a recipe book so you can make various types of blends for your baby. As a first time mother with Emily, I was clueless on what gourmet dishes to make. But honestly, its pretty basic. You first start off basic with only single fruits/veggies for a few consistent days and move on to combine two fruits/vegetables to blend. Here's a quick and easy explanation from the Baby bullet website.

I hope this post can save other parents some money and skip the Babybullet.

Friday, October 24, 2014

Leasing to save money

This post was really hard for me to write because everyone's situation is different. Today I wanted to discuss numbers and money… especially monies that go into owning a car.  Here I present to you two case scenarios:

Case scenario #1 purchase a new toyota top of the line prius fully loaded for $30K . I picked that car because it has a very high customer satisfaction rate, reliable, low depreciation value, and was my initial choice if I didnt get a volt. You use the car for 6 years and decide to sell because a newer and better car came out. On average I notice everyone around me switches cars once every 3-5 years. By 3-5 years the depreciation value of the prius is down about $5-10k depending on the condition of the car. You are also stuck with an older model/car for longer PLUS higher monthly/down payments. If you do $1000 down with 0% apr payments will be about $500 in an optimal situation. You only break even after 10 years of use for a car.

Case scenario #2 My case. Lease a Volt for MSRP of $31K. I use the car for 3 years and return to get another nicer, newer car. My lease is an ideal/optimal situation because I waited for a good deal before I decided to lease. I paid $1000 out the door down payment which includes first month payment (includes all taxes, DMV fees, etc) and monthly payment of $189. I also qualify for $1500 cash rebate from the state and get a $600 gift card from Costco.

In case you missed some details of the scenario.. here it is in a short and sweet list of what happens after three years.

To buy $18,500 spent over the course of 3 years for a brand new fully loaded prius. ($1000 down+ $500x35 month=$18500) and continue to pay for another 2 years before it becomes mines.

To lease $6,500 spent over the course of 3 years for a brand new base model volt. ($1000 down + $200x35 months -$1500 cash rebate from state) and move on to another deal or buy another car.

In theory there is a $12,000 difference from buying versus leasing over 3 years. Numbers are just estimates. Every situation will be a little different. The prius seems to hold its value pretty well compared to other vehicles. Generally speaking by the end of year three an average car will lose close to half of its initial MSRP value.

For us, after much thought, we agreed that after every 5-7 years we will trade/get another new car. I would also love to hear what others have experienced after purchasing a new car at the end of their five year term. Do you have the urge to look for another newer/improved car with less issues? We personally have an SUV and its a very good car and can last us a long time but we felt that its too expensive to maintain/own and its no longer new to us.

The volt gives us about 35-40 miles range per a full charge which is about the furthest I travel round trip. On average I really travel about 20-30 miles a day for shopping, food, grocery, etc. If I go to work its literally 6 miles round trip. So in theory, on a daily basis I would never really need to pump gas unless I drive around and run errands. Gas on the volt gives me 35-40 MPG which is also pretty good. Only time we would need the gas to kick in would be traveling to SD or LA.

Currently, I pay about $150-200 a month on gas alone driving around town in my SUV. My volt payment is about $200 including taxes. And after the state rebate and costco gift card, i'm probably actually breaking pretty close to even to lease and operate the volt over the course of three years. My down payment was $1000 but I get $1500 from the state so I'm making $500 and getting a $600 costco gift card. If my electricity bill is up by $60-100 (using the highest tier from my electricity bill) a month from charging my car day and night then I basically break even the first full year of use. Also note that I don't drive much so my bill isn't that high compared to someone who drives 20,000 miles a year. I also wanted to mention that owning a new car will always cost money even if you buy or lease. Buying a car would only be worth it if you really keep it for over 10 years.  Keeping a car for over 10 years is something our family have decided we won't be doing anytime soon.  If everything goes as planned we will have big announcements on our next big purchase for solar panels. If the deal goes through, driving the volt will be free for us. More details to follow in the future.

So in summary, welcome my new Volt. 


End of the year is coming up and many places are having really good deals on their leases.  I used incentives and stacked a lot of rebates to get to the price I wanted to pay.  In the end we decided leasing was a better more affordable option for us since we are planning to install solar. 

And honestly, driving a Prius cannot be as fun as driving a Volt. I'm not saying the prius is a bad car, just saying the volt is a better car. In the end, I feel I got more bang for my buck leasing a Volt since I don't use many miles per a year.

The Volt is a really good option if you have low income household rates for your electricity bill. It will cost you as low as $1 a day to charge 10+ hours. But if you are paying premium rates tier 3-4 at $0.30 kw it will cost you $3-4 a day, the prius will be a better deal. We are getting solar so it will be free or at most $1 a day to operate since we will be in Tier 1 costs. 

If my theory and calculations are wrong please inform me. I'm very open to discussion since we will need to decide in three years to purchase or lease again. 

Update on the Nissan Leaf: My husband loves his car. He was able to get the EZ charge card which gives free charging for stations such as charge point, EVgo, etc. Its one card that works for all the stations. Charging his car is free for the quick charge 30 minutes to charge 80% or one hour of regular charge for the next two years. My husband has not been charging at home at all. He only charges at work and on weekends we charge when we are on the go. A 30 minute wait with free electricity and the AC blast on cold to feed a hungry baby isn't a bad deal in our opinion. The leaf has worked very well for our family. Last week we went to pick up my Volt in Van Nuys and while doing paper work we were able to charge his car at the dealer, so the round trip was free for us. 

Here's more information for those interested in the EZ charge card.

Monday, October 20, 2014

Halloween is almost here.. part 1

I'm back and ready to post about our budget halloween decorations. This year we are hosting Halloween so I wanted to try to decorate a little. Its so hard to do anything with two young kids nowadays. Kaley is starting to eat solids so I'll be able to make her baby food and toss her to daddy more often. Before when she was only breastfed, she was all mines night and day. Now its time for Binh to do some daddy duties; that also means I have all the time in the world to sleep. Jk. All kidding aside… this year I wanted to decorate for Halloween. This is also our first year decorating for Halloween.  I started off with nothing. I spent $35 on all the decorations. Most were from Dollartree and a big spider from online.

Since Emily is still young, I had to find kid friendly theme. After much thought I decided on itsy bitsy spider theme. Emily had a lot of fun counting the spiders and helping me spread out the spider webs. It took about 30 minutes to hang all the spiders and web by myself. I made a simple warning sign out of regular white card stock I had from previous projects. I wanted to make a few more signs but I ran out of ink so I'll have to order more ink. I copied Brooklyn limestones spider infestation theme.


I bought this big spider from a chinese website. I thought it was going to be a lot bigger but it will do for now. I'm still in the search for a giant spider to go on the roof of my house. 


I bought some rats, spiders and web from Dollartree. I thought the rats were so cute. They are motion sensed so whenever someone comes by they make rat sounds. 


Here's a close up picture of the rats. 


Here's my simple $35 Halloween decor for now. I'm planning to add more if I have time. 

Saturday, September 13, 2014

Budget frozen princess party decor

I'm back as promised from a few days ago to update on Emily's last minute party planning/decor. As mentioned a few days ago this whole table setting cost about $30 excluding the actual cake.


Birthday banner was made using Dollartree construction paper. I did have to buy two more packs of paper because I ran out of blue. 


Oh.. the story of the cake. Its always the item I dread the most because .. pretty cakes are so darn expensive. I baked the cupcakes myself and ordered a 6 inch cake from Dolce. When I came to ask how much it would cost to make the Frozen cake with the characters, I was quoted $15+ for a fondant crown or characters…. not including the cake itself…Ugh.. I thought about it and said.. give me a basic cake and I'll put my own topping on it. $30 later and $1 crown I got this cake. 


I made the tutu myself with sparkly fabric from Micheals. I stitched it onto card stock and spray glued it onto the base of the cake. The cake stand was just made from Dollartree foam board cut into circles held up by clear cups. 


I bought a regular cake from costco for under $20 to serve everyone. So all together I really spent about $100 for all the decor and cakes. 

Thursday, September 11, 2014

Our upcoming princess party…

Last weekend Emily got introduced to Frozen the movie and she now thinks she's queen Elsa or Princess Ana. She watches "Let it go" about 10x a day. So per Emily's request she wants a Frozen princess birthday party. Our little princess just has so many demands for being only three. As I scramble online to look for Frozen decorations I quickly came to realize that Frozen anything equals $$$$. Ugh… I was pretty sad. I really didn't want to spend a lot of money on decorations. I'm budget Kimba remember… So I thought long and hard and made my own decorations with what I have at home.

So … for $0 I made this:


Lucky us, I have a lot of Christmas decorations. I took out our two white christmas trees and started decorating. The rest of the decorations are just paper. I bought some Dollartree construction paper for Emily's birthday before so I simply just used whatever that was left.  I made the banner out of construction paper. The paper quality isn't the best but its just a banner. I don't think anyone would really notice. I usually like my banners to be simple because I don't have a fancy circuit.  I just cut blue construction paper into my desired shape, pink paper into a circle, and print out a simple dark blue letter on white paper and taped them all together. Snow flakes were made out of regular white paper. Taped everything up and called it a day. The characters were made out of simple cardboard paper held up by a half empty water bottle. The real dolls/figurines were too expensive for me to buy so I made them out of cardstock paper.

I still have the main table to decorate. Here's a simple in progress display of what I have so far:


I'm still missing a lot of details on this table (i.e birthday banner, cake, etc) but its a good start. I made all the water bottle labels out of regular cardstock. After I designed and printed out my water bottle labels, I started cutting them into strips. 


As I was working on the design, I put our little  princess Emily to work also. She volunteered to pull off all the labels. She was so proud to help out with her party. Every time grandparents came over she would run to get her water bottle to show off to them that she helped make them.


Here's a bottle up close. 

 
Here's all of them completed. 

Coordinating party favors were made using white target paper lunch bags, dollartree party favors, and a label I made and printed from home. Cost for this whole table display so far is under $30 including water bottles, favor bags, and wannabe cake stand.  Hopefully I'll be back soon to blog about her final table display once its finished. Most likely it won't be done until the day of her party. I'm a procrastinator like that.

I wanted to really blog about event planning because I wanted everyone to know that party decorations don't have to cost a lot. There are many simple ways to have a themed party on a budget. Look around your house for items that can be used and always save left over party supplies for future parties. For each party that I've hosted, I've made one or two big purchases so I can save for future parties. For example, I purchased a waterslide for the kids because I knew renting a jumper/waterslide overtime would cost us more. So far the slide has been a big hit for every party. I've also bought chairs for $1 each on craigslist so I don't even have to rent chairs anymore. This party I didn't really have to buy anything big. Decorations hardly cost me anything so now I only have to worry about ordering food. 

Next post will be about expensive cakes and how to save money on them. I'm still in the trial and error stages of trying different techniques so I'll be back with more details soon. As for now, happy planning everyone. 

** As for anyone who needs help or wants to use any of my templates please PM me. I'm happy to share free templates.