Saturday, August 13, 2016

Longest bathroom reno

I'm back today with some updates on our bathroom renovation. Last time I left off, everything was pulled out and I had just tiled the floors. We came across some mold and plumbing issues that painfully costed us $1500. We had to redo the plumbing to accommodate a tub since it was originally a shower and completely redo the subfloor because it had mold. Then I had oral surgery. So everything had to be delayed.

Here are some quick pictures I snapped. The kids bathroom has no window and is tiny so I decided to stick with light and bright colors to try to open up the space.  The floors are a nice light gray wood look tile. I got them at a discounted tile store locally for $1.50 sf.


For the vanity, I choose a white with marble top to brighten up the space. Since the vanity is the first thing you see when you walk into the room, I wanted to get something a little more fancy. I didn't want to go custom since that would cost a lot so I searched CL and found this brand new vanity for only $450. It's sold online for over $1000. Heres the specs from HomeDepot. vanity. It has fancy crystal knobs and soft close drawers. 


Up next on my shopping list was a new white and shiny tub. I wanted a nice and deep tub and found a new one on CL for $140. Its sold at Home Depot for $350. Heres the info for anyone interested. bathtub


After tub was put in, it took forever to start tiling. I enlisted the help of my cousin to put in the niche and make the difficult round cuts for the faucets. I choose a white carrara marble tile to brighten up the space. I bought them from Home depot at a discounted price. Here's the info for those interested. 


 For the niche, I debated for a long time on what I wanted. Binh wanted a bold backsplash that stands out. I wanted a simple and classic look. I felt that the room is already so small and adding more color and contrasting details will further crowd the room. In the end, Binh let me do whatever I wanted. I'm glad I choose something simple because it goes well with the marble. 


For the toilet, Binh had a special request. He once saw a touchless toilet at a model home and he had to have that toilet. Since Binh's favorite pastime is hiding in the toilet with his laptop, phone and chargers, I gave in to his request.


Here's the actual room layout. Its very strange. The toilet is on the left, vanity right in the middle and tub to the right. I'm hoping that bringing in a big white mirror would further brighten things up. 


I'll be back very soon to update on the final touches of this bathroom. Our handyman is coming tomorrow to install the faucets, shower trim, and caulk. 

Wednesday, July 6, 2016

Dining room table part 1

I've been browsing craigslist lately to look for furniture to add to our new home. I finally found a large dining room set for $90 about 10 minutes from our house. With our first home, we had a large heavy formal dining table and formal living room that nobody ever used. The chairs for our formal dining room were so big and heavy they never got moved. This time around, I wanted something useful I could use everyday. Since our new house has no formal living space, I knew I needed a bigger table. This table can sit eight comfortably. Its big, heavy, sturdy, and has great details.  

These are the stock pictures from the craigslist ad. 


Our bathroom renovation actually hit a major roadblock. We had mold and plumbing issues.  The plumber gave me quote for $1400 to repair the sub flooring, convert a shower to tub layout, re-plumb the drain out for the tub, build the frame for the tub, and redo some illegal electrical wiring in the bathroom. Long vent short, my $2K budget is down the drain. I'm guessing my total budget will come out somewhere between $3K.

Since I couldn't work on the kids bathroom right away, I decided to demo the powder room downstairs. A powder room is just another fancy name for a half bath. :) Everything in that room is gutted. I'm proud to say that I gutted more than half of that room myself. We are expecting to finish up that bathroom by mid next week.

Back to my dining room set. I first filled minor cracks with wood filler. I let it dry and lightly sanded it down. You can see int he picture below where I filled them in.


Next I primed with Zinsser cover stain primer. I painted the whole set three times in case I have bleed through. Below is the primer and how the dining set looked after one coat of primer.


This is how the table looks today with three coats of primer and two thin coats of paint. For the paint, I wanted something very durable since we will be using this table a lot. I decided on Benjamin Moore's advance paint in satin in a slightly off white color. I was told if you add just a tint of color to the pure white, it will cover better. This paint when fully cured will be very solid and won't peel/scratch easily. It will take about a whole week to fully cure.


Here's how the chairs looked without the seat cushions. I'm planning to add upholstery to the backs therefore I left the backs original.


I'll be back in a few days to finish up the dining room set. I ordered some upholstery supplies online so I'm on a standstill with the the dining set.

Wednesday, June 22, 2016

Latest update

I'm finally back after a long break. The reason for my disappearance was because we sold our first home and have closed escrow on our second home. Yep all that happened in a year. We move as fast as snails around here.

Jan 29th, 2016 was a bitter sweet day for our family. We officially left our first home. It was the home that we brought both our girls home from the hospital to, threw so many birthday parties, first home Binh and I lived together in. We ended up selling almost everything inside the house except for our mattress, TV, and the kids toys. Here are some pictures that I took of our home when we listed it for sale.


Now that we finally closed on our second home, I can't wait to start sharing new DIY projects. Our second home is the total opposite of our first home. Its a two story, older, much smaller, and needs lots of updating. 


Sunday, May 10, 2015

Kaley's Bow-tique

Happy belated Mothers day to all the mother figures out there. I hope everyone got to celebrate with their loved ones.

Today I wanted to share some images from Kaley's birthday party. We had some last minute changes with Kaley's party due to a date switch and then some cold gloomy weather. In addition it was also mother's day weekend so we knew our guest list wouldn't be as big as our previous parties. However, our wonderful photographer was able to capture some precious moments for us. For Emily's previous parties, we have always snapped some simple family pictures but this time our photographer took them instead. When he posted some same day edits I was blown away by how organized and nice everything looked. Pictures do lie. LOL

Here are some same day edits compliments of our photographer LeVie photography. Enjoy.


These utensil holders were so cute to me I had to snap a picture to share. They were last minute finds at the 99c store on Central. I added a polka dot paper bow and glam them up for the party. 


Matching spoon and fork holders. 


Simple polka dot water bottles because I was running out of pink ink. LOL  


I wanted to mention about this Minnie bar. I've had quite a few people compliment on it so I have to give proper credit to the creator of this adorable piece. My sister designed and decorated the bar herself. I gave her a budget of $100 and the rest was history. She did an amazing job creating a fun, cute, and girly Minnie bar for the kids to enjoy. 


Glass dispenser (brand: Godinger) purchased a long time ago at Macy's 
middle shelf: DIY tray I made for my sister a long time ago. 
Last shelf: plastic bin $3 at Target with paper Minnie and lemonade in jars. 


Wednesday, May 6, 2015

Extreme couponing

I'm back today with more ways to save money around the home. I initially started this blog to chronicle my adventures turning our house into a home and I feel part of that process includes saving money. Today I would like my readers to step back and try to coupon. I've tried to coupon before but quit half way due to my frustration and feeling like it was a total waste of my time. However, after reading so many brags blogs about couponing I was inspired to give it another try.

Today I'm happy to announce that I'm the new extreme couponer. I also want to stress that I do not clip any paper coupons, shop at only one store which is target, and strictly buy ONLY what I really use. The last step is very important in preventing hoarding problems.

I bought $105 worth of stuff for under $35 AFTER all the taxes.


Here's the breakdown

Keyterms:
Q= coupon printed from coupons.com. You need to install the program to print free coupons from home. You can print a max of two identical coupons from each computer.
GC=gift card from Target 

Here I present to you my shopping trip for personal items and baby supplies.

*speed stick $3.50x2=$7
     -$4.00 (2Q)
*olay body wash $4.99
     -$1.25 Q
*Glide floss double pack $5.79
     -$0.50c Q
*Colgate mouthwash $4.99x2=$10.00
     -$4.00 2Q (old Q, no longer available for print, but you can sub this item with Listerine. Q value is only $2 for two plus cartwheel discount)
*Listerine mouthwash $5.79x2=$12.00
     -$2  2Q
     -$1.20 from 10% off cartwheel
*Irish spring body wash for men $3.99x2=$8.00
     -$3.00 2Q
*Pantene pro-v shampoo $3.49
     -$1.00 Q

Target special: receive $10 GC when you buy $40 worth of personal items. Above items meets the minimum of $40.00 before any coupons applied. Plus buy four oral care items (listerine and collgate) get $5 GC. Total savings from coupons is about $15 give or take.  Total out of pocket after deducting $15 ($10+$5) GC will be $11.00. Its not the greatest in savings but these are the items my family uses.

But thats not the only thing on my shopping list. Up next .. break down of our baby items. This was also in one shopping trip. I just split up the list to break down the coupon deals.

Huggies diapers super pack $24.99x2=$50
     -$9.00 Q (coupons print from here) You have to print two $4.50 coupons.
     -$2.37- target cartwheel 5% off huggies diapers
     -$10 GC when you buy two boxes of diapers
Huggies wipes small pack $3.50
     -$2.00 Q (coupon will print from link above, not through coupons.com)
     -$0.08c-5% cartwheel

Get $10 GC for making baby registry and printing it out. Coupon for $10 GC at the end of registry.

Text baby4 to 827438 to get another $3.50 coupon on your phone for huggies diapers and wipes

I also use an app called Ibotta to get rebates and they have a rebate running for another $3 off wipes/baby items. Here's my Ibotta team. Join my team to earn more rebates together. LINK

I received a Q from a previous purchase for $7 off huggies at target. No limit that can be combined with everything.

To sum things up, total cost before Qs and GC about $55.00 but after $22 in Qs and $20 back in GC plus $3 ibotta rebate, my total out of pocket $10.00

Grand total for whole shopping trip for personal and baby items before discounts was about $105.00 but I paid $35.xx after taxes. Unfortunately I have to pay tax for the before discount price of $105.00 instead of $25 but hey…. its ok.. I feel like I'm getting a great deal.

Lastly, when i bought all this I got another Huggies coupon for $5 off, so I plan to make another trip back to Target for more baby deals. 

I wanted to stress that yes.. getting started with coupons is a hassle and seems like a total waste of time but once all your apps/websites and cards are all set up everything will be less frustrating and much more rewarding. I do not clip any real paper coupons unless its sent to me in the mail for free. All my coupons are strictly online or else through rebates. 

Honestly, I can now say that costco is a waste of money. We don't like shopping at costco because although bulk prices are good, its just not cheap enough for us. LOL I'll try my best to blog about good deals on coupons when I come across them. Ever since I've started couponing, I think I've saved a ball park of 30-40% overall in my grocery bill. Its not a lot but it adds up fast. I try to stock up on items that do go on sale but even at deep discounts taxes add up fast. 


Saturday, April 25, 2015

A little about Kaley's Bow-tique

Where has the time gone? Our youngest daughter is almost one. :( I've been sad thinking about my last child turning into a toddler. I don't plan to have any more children so I know I need to cherish Kaley's baby stages even more. She's almost one and I can't do anything about turning back the hands of time.  I've been trying to focus on her birthday as a celebration instead of mommy being super hormonal since my baby is turning one. Kaley is officially walking now, super active, and loves playing with her sister Emily.

For Kaley's party, I knew I wanted a Minnie mouse theme. It will be about pretty bows and all things girly. I started off with her simple DIY invitation. I usually don't do invitations because I'm actually very lazy but its Kaley's first birthday so I wanted to be extra special. Plus it helped that Joanns was having a super sale on their craft paper (50%) and I was able to score another 20% total purchase a few weeks ago. I think my total for 25 invitations was under $3 for paper. I had some envelopes from Emily's party last year. I've only made about 10 invitations because my kids won't leave me alone. Everything is all chopped up and ready to be glued. 


I think the bow adds the extra touch to these invitations. Bow was hand made from dollar tree ribbon. I really only had to buy the polka dot paper and black cardstock paper. I scored a great deal on the card stock, only $1.30 for a package of 50 pages. Of course I picked up white and black for the party. I followed these instructions for her invitation.


I'm actually running out of colored ink (specifically pink) from overprinting so many of Emily's party decor so Kaley's was printed in all black. I've been lazy to order new ink. I think it looks good in black and easy to read.


Next on my to do list is the giant mantel. I never know what to do with that huge space. Fortunately for me, our cousin just got married recently and was willing to lend me her decor. 

At first, I thought this project was going to be easy but boy was I wrong. I think I was on that mantel for at least 1.5 hours if not 2. Thank goodness I didn't have to cut and fold them. But once the mantel was done, it looked amazing. 


I started piecing them on the floor first. 


And here she is… 


I thought it was cute to change Minnie's bow-tique to Kaley's Bowtique. For those who haven't seen Minnie mouse cartoons, her story revolves around her shop called Minnie's Bow-tique. 

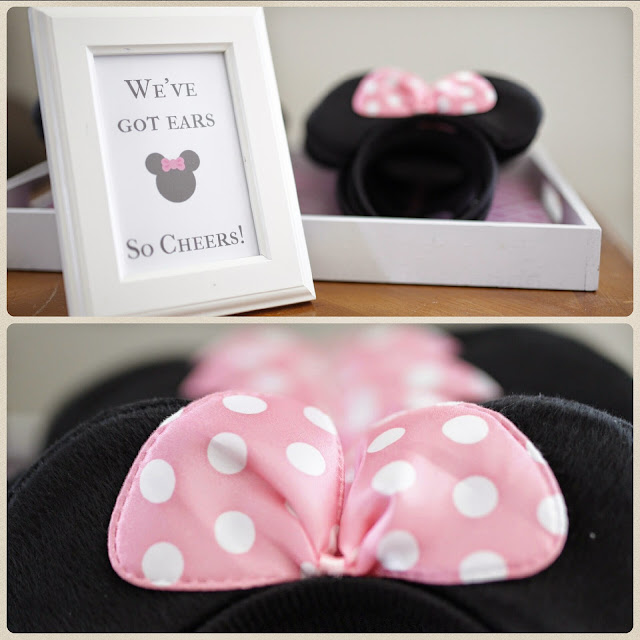
Lastly, I've ordered some ears for all the kids to wear and take home. 


I initially had great plans to make a custom box to display the ears but my kids got in the way so I just threw them on my spare tray and printed out a simple sign and called it a day. 

I'm planning to work on the banner, water bottles, and maybe cake stand this weekend. Once those are done, I think I'm almost ready for the party. 

Have a good weekend. I'll be back soon with more party planning updates and backyard progress. 


Friday, April 24, 2015

Additions to our backyard

Lately I've been busy updating our backyard for our upcoming Minnie mouse party. The last few years, I've always set up tables for guests to sit outside but it seems like no one ever sits outside except for the men who drink. This year, I've decided to completely forgo extra tables and seating and let the guests sit wherever they feel comfortable. However, that means I have to find extra seating for the backyard. So far, I've added a patio sofa and some dining chairs.

Today I'm back to report that I've added a few more pieces I found on CL. I've added a long bench, chair, and table. The chair and bench were bought on CL for only $20 ($10 each from the same person). I really loved the chair because it matches my sofa.


Here's their transformation after a little bit of black outdoor paint and a cushion makeover with the same fabric from my sofa makeover. 


Here's my sofa to refresh your memory. 


I bought the Angso table from Ikea for $200. I usually don't buy new furniture anymore but I felt that it was a sturdy table that would last a long time. It was also a good size and could comfortably seat eight people. I initially was going to get the Applaro for $100 during their sale but was disappointed in the size and quality of that table. 


I have a few small upcoming projects for the backyard that include a $15 6x9 rug makeover and $10
solar DIY chandelier. Lastly, I have yet to blog about Kaley's party projects because they are mostly incomplete. I've gathered supplies and have started on some but none are complete yet. Hopefully I can have a blog post about her invitations by tomorrow. As for now, Happy Friday!! Enjoy your weekend.