Sunday, July 12, 2020

Recap of yard progress


    Our backyard is pretty big, we sit on a quarter acre lot. Its nice but it's like a curse. I feel like I have to put so much money on landscaping and filling up the space. When we first bought the house, the back yard literally had nothing but a pool and lots of grass. For the last four years, I've been scratching my head and trying to find ways to fill up the space and slowly removing all the grass. So far I've managed to finish up about 75% of the yard. I've gotten rid of 50% of the grass and replaced with fruit trees or flowers (hydrangeas) and hardscape. Here are some old pictures of before and after completed sections of the yard.

Side yard: before it was all grass. We added pavers, pergola, replaced side gate, landscape, and a two story playhouse for the kids. 


We expand our house by adding a sunroom with balcony on top. Even after the sunroom, we had plenty of grass left so we added lots of pavers. 

This picture was during construction of the sunroom. Everything in the yard was grass and an empty slate. 


Heres an old picture of the exterior of the sunroom. 


This is area to the side of the sunroom. We added lots of pavers and made a beautiful trellis. My vine was growing so beautiful until.. I forgot to water it. So now I have to start over again. :(


Towards the back of the yard, we added a storage shed and landscaped with left over pavers. 


     Anywho, aside from the progress of our yard, I also wanted to mention a fast and unconventional way to lay pavers. We had lots of dead space to the right of the pool. We started off by digging about 2 inches of dirt and leveling it. Leveling wasn't perfect but it was okay. Then, we laid PLYWOOD on the dirt to level it and laid pavers on top. Yep... you heard me right. We put plywood as the base. When my dad first told me about plywood.. I shook my head and said no way it would work. My dad insist that it would work and I trust my dad 100%. He had just finished a demo project that had a few good pieces of used plywood so it was free. We literally only had to buy the pavers. Total out of pocket cost $130 for 110 sf of pavers and paver edging. I already had left over paver joint sand from previous paver projects. We bought 110 pavers but received a whole pallet which was 140+ pavers. It was a score because now I can use the extra pavers for a walkway.
    I wanted to put this post on the record so in five or ten years, someone come back and see if we either failed terribly and need to redo or it was a success. The purpose of adding plywood is to level the base without having to add gravel/sand etc. The logic is.. when the plywood does rot/mold/breakdown, it would still be buried in the ground and should still be in place. My dad attempted this with a small paver slab on the side of his house many years ago as a temporary solution. According to him, its been about 8-10 years and the pavers are still in place. The plywood is probably broken down but its still holding the pavers in place with no issues. I also wanted to mention, the paver slab isn't touching any framing around my house. It sits away from the house, kinda like a remote island.

Here are some before pictures. The space is big and very empty. 


The plan was to add a bbq grill and later down the line add a fire pit and landscape. 


My dad helped me put up a simple pergola with added shading.
The cost breakdown estimation:
  - pavers $130
  -plastic edging and extra large nails $40 (already had some from previous projects)
  -wood for pergola $100
  - brackets for base and concrete/extras such as screws $50
  -exterior paint $35
  -sail shade from amazon 8x10 size $35

total about $400

We are almost done building the built in bbq. Here are the latest progress of the bbq grill. Stay tuned for the upcoming reveal.


Thursday, October 17, 2019

Easy $11 Halloween decorations

Today I wanted to share I how frugally transformed the interior of our home for Halloween for under $11.

Supplies :

Party City- spider web vinyl window cutouts $1
Dollartree- plastic skull, plastic spider, happy halloween banner $3
Amazon: black construction paper $1.50, black rat cut outs $5.50 (when I bought it was $5.50. price has gone up)


Here is our home after the $11 decorations. 


I hope by sharing this post, parents can feel motivated to decorate their homes and not have to spend a fortune.  Its nothing fancy, very simple but still very fun for the kids.


Thursday, May 9, 2019

Media console makeover

Finally after staying at our home for close to three years, I've tackled our most used space in our home, the living room. For some odd reason, I decorate the least used space first and always leave our living room last. Our last home, the living room was one of the last places I decorated before selling it. Today I wanted to share a $200 makeover in our living room. I bought a $35 used dresser on offerup and refinished it with some left over paint in our garage.


Then, I headed to home depot to gather $80 worth of other supplies which included a tv mount and in wall cord management system. I've hung our TV using various mounting systems before but hands down this basic tv mount is the best. It is basic so no special swivel abilities like the costco ones but I give it five stars. I don't think I need my tv to do somersaults. I just need to it look clean, wire free, and hung nicely on the wall. They make it so easy to install. I screwed them directly onto our studs. I believe the kit only comes with screws for wood and brick walls so be prepared to look for studs if you plan to use their screws.


After everything was hung and I hid all the wires behind the wall I headed to walmart to grab and IR extender. I hate the look of exposed wires and cable boxes etc. This device lets you hide all your devices in the drawer. Instructions are pretty straight forward and took me about five minutes to connect to our devices. 


Here are some before and after pictures of our media console area in the living room. 


Friday, February 22, 2019

Simple DIY solar shed lights

Today I wanted to share how I spent $30 to create lighting for our Arrow shed we just assembled.
I ordered two solar lights from Amazon for $25 (Aootek 48 LED solar lights) and headed to Homedepot for $5 worth of scrap wood. I forgot what the size was for the bigger piece but the thinner pieces were 1x2x8 ($1 each). I really like the solar lights because they have three different settings. I use setting B which is on dim at night but when you come close it brightens up. I love that they are solar so I don't have to run any electrical wiring. 


I painted them black with some old exterior black paint I had laying in my garage and chopped them into pieces with my saw. 


I spent about 5 minutes each light to staple them together. I just thought of the design in my head and just improvised as I went. 

First I stapled two boxes. 


I added four shorter pieces and assembled them into a box. 


I added one more thin piece of scrap wood and one thick piece of wood for aesthetics. 


Second coat of black paint went on. The wall light is not perfect but its good enough for me. I didn't want the shed to look so plain in our backyard. 


Finally add the solar light with screws and screw it onto the wall. 


Here they are with our new Arrow shed I just finished assembling on Wednesday. We also added a nice step at the door with some home depot concrete pavers. ($8 total). I used some left over bricks for the bottom and laid the bigger pavers on top. Today I stopped by Costco and picked up two lavender bushes for $12 each. They smell so good and I can't wait to start landscaping my back yard. 


Here is a breakdown for cost of shed project. 

Arrow shed from Lowes with 10% coupon $320
Two DIY solar lights $30
Base/gravel/concrete $70
Two lavender bushes from Costco $24
Pavers $8

Total: $452


Cost for total project was pretty high but a great investment. The shed not only adds storage space but also nice lighting to our otherwise dark yard. We have a pretty big size lot, about 13,000 square feet so free solar lights is a win in my books. Another great feature is less grass to maintain and water. Along that wall I plan to add drought tolerant plants and succulents so it will further help with reducing water costs. It doesn't seem like much savings in water but we have a pool and our water bill always seems high so every little helps. 

Stay tune for more budget friendly backyard projects. I plan on building a built in bbq, diy pavers for our whole backyard, redo our front yard, and new landscaping. 


*** Update: landscaped shed with some left over bricks from previous project and two new fruit trees from Costco. 


Sunday, February 17, 2019

Untraditional base for shed

I'm back today to write a post about building a cheap base/foundation for a metal shed. My initial instinct was to pour a small concrete pad but after much debate I figured out a much cheaper alternative. Having a professional pour a small concrete pad would have ran us $600-800. Our shed is going to be 10x8. We purchased the shed for $320 at Lowes with a 10% off coupon. Its called Arrow galvanized steel shed for those who are interested. Its a great price for that size. 

Our previous contractor left two huge beams at our house because he ordered the wrong ones. For the longest time, I didn't know what to do with the beams. They were too big to cut down and throw away and it seemed like such a waste for such good quality beams. We ended up using them as our frame for the base. We split one beam in half lengthwise since we were missing one side. 


I understand not everyone will have huge beams laying around like us but you can easily purchase pressure treated lumber.  It will cost about $20 per a 4x4 12 footer. 

Next instead of using all gravel to fill up the base we used what we had laying around in our yard. When we built our rental addition and sunroom, the contractors pulled up so many red bricks that were used as boarders around the yard. The contractors charged to haul them away so I said leave it in my yard. We will deal with them at a later time. They sat in a pile in our yard until yesterday. 


We put all the bricks inside the frame we built for the base and headed to homedepot for some gravel.  We ended up buying only two bags of gravel for $60. While we were waiting for them to load the gravel my dad noticed some cement mix marked down for 75% off due to exposure to water and some ripped bags. We picked them all up for about $10 and headed home. We used the wheelbarrow to move all the gravel and cement to the back and inside the frame. We sprayed some water on top for the cement to mix and called it a night. We spent about 4 hours total building the frame and hauling gravel to the back. 


The next morning everything was dried and top layer cemented. I don't know if the cement would last but I used some left over garage flooring from my previous project and lined it on top. Having a solid concrete base would have been great and lasted forever but honestly, our shed is only $300. I really didn't want to spend alot of money on the base. The base we built might break down in 10-15 years but i'll still be happy I got my money's worth. 


Total spent for the base of the shed : $70. I am happy that I was able to recycle what I had laying around, cleaned up our yard and saved money at the same time. Without the bricks, I would need 4 tons of gravel to fill up the frame. I'll be building the shed by myself the next few days if it doesn't rain. I can't wait to finish it and started adding flower beds and decorations to our yard. Our yard has been severely neglected ever since we bought  the home. 


Monday, March 12, 2018

Rental unit update

Today I'm back to share more details of our first rental unit. Its near completion with some minor details that are missing. Exterior is a total disaster but I have some big plans to update the space in the near future. Lets go back to how everything started. When we first the addition/rental everything was just an empty space. I worked with the architect to design the preliminary space. I knew that space was small so I needed tall ceilings. We decided on 9 ft tall ceilings because any higher we would have to pay more.  This was how things looked after foundation, ceiling, and framing was up. 


Things started to look less raw after drywall and electrical were installed. 


Before drywall was installed, I was already befriending people at Ikea to design our future kitchen. Here was a mock up from their kitchen planner. 


After I finalized our kitchen plans, I started collecting coupons and gift cards at Ikea to save 20% on their cabinets. We ended up installing the kitchen cabinets ourselves. Our overall experience was pretty pleasant. I had my dad help install/hang the upper cabinets. Everything else, I did on my own. I think if you can assemble Ikeas furniture, you can assemble their kitchen cabinets. You tube instructions were pretty straight forward. 


After laying laminate flooring, painting the island legs, adding backsplash, and installing appliances things were starting to look more polished and presentable. Here are some current pictures.


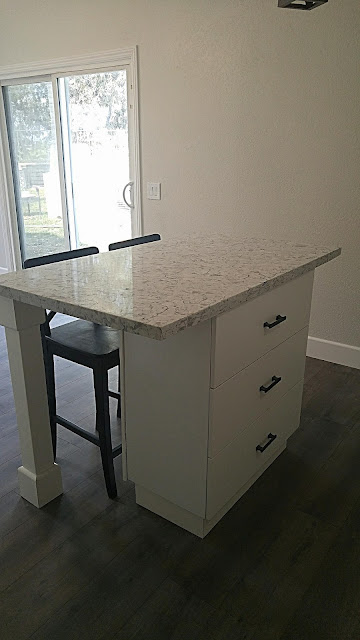
When I was designing the kitchen, Binh and I had a discussion over the kitchen island. Binh wanted a dining table and no island. I insisted on having a small kitchen island with seating options in place of a dining table. I'm glad I stuck with my original design. The island is small but can seat four people comfortably. I provided two black barstools but the tenants can add two more white backless barstools for more seating if they wanted. 


The small wine rack was a last minute decision. We had a seven inch gap that we didn't know what to do with so I stuck a wine rack in there. The trash can will be installed inside the sink cabinet. It makes everything feel a little bit fancier with a pull out trashcan and wine rack.


I ended up splurging on the appliances. I knew from the beginning I wanted a counter depth fridge and slide in range.  I know its not necessary for a rental but it just looks so much nicer. Everything is flush to the cabinets.  We nicked the dishwasher. The kitchen is quite small and we figured it will be only for a single person or couple. They can hand wash their dishes.


I still need to tile one more row underneath the microwave.


Heres a picture of the living room and front door. I had some left over paint from painting our front door so I painted the first coat of blue for this door.  I will have to paint the second coat soon.  The living room comes with a simple sofa.


We just finished installing the closet rods/shelves today and put the head board in the room. I have a dresser I plan to refinish and put in the room but that will have to wait. The bedroom will only need a queen size mattress since we are providing the bed frame and dresser.


Lastly, the unit comes with its own single car garage with direct access. The washer and dryer is located in the garage. 


Everything took us about 4.5 months to complete. We started on Oct 31st. We are not quite done yet but its ready for showings and will be ready by April 1st. Hope you guys enjoyed the mini tour and I will be back to blog about the rental back yard. 


Saturday, February 17, 2018

Ikea Kitchen

Today i'm back to share some exciting kitchen updates. I debated for a long time if I wanted to buy Ikea kitchen cabinets vs. RTA  cabinets. I currently have RTA cabinets in my kitchen and love them. I bought them from a local company and they did the installation. I only tiled the backsplash.  I've heard negative reviews from some friends that RTA cabinets in color were bad quality and the paint color comes off. I, however have white cabinets and have not had an issue with paint chipping. However, I was upgraded to their higher end cabinets by accident. The person that put in my initial quote, gave me their most expensive cabinet but I paid for the cheapest cabinets. I just got really lucky.

I ended up with Ikea cabinets instead of RTA cabinets for the rental because the budget calls for it and most importantly, ikea's 25 year warranty on their cabinets. I know Ikea is not known for long lasting quality but their warranty sounded good. Plus, all their cabinets uses the same frame, just different fronts. I figured if our renters don't take care of cabinets then I can reface them every few years. I ended buying Ikeas Haggeby white cabinets which were their most affordable option. Each front cost under $10 to replace which sounded too good to be true. We have 17 fronts so it would cost us under $170 to replace/reface.

We spent $1500 on the cabinets originally but was able to return some unused items and got back $350.  Of course I used ikea coupons and bought ikea gift cards which helped knock out 20%. If you sign up for ikeas movers coupon they give you $25 off $250. Retail me not has Ikea gift cards for 10% off. So total out of pocket for us was under $1000 for all the cabinets and a sink.  It includes a small island (30x51) and 13 feet long row of cabinets.


I got a killer deal on the quartz countertop by shopping on offer up. I found a gentlemen who fabricates quartz for a living. He was selling a remnant piece of quartz he kept from a customer. The remnant piece just happens to fit my island almost perfectly. I was initially quoted close to $2000 for the countertops from a local company. I really wanted quartz so I looked around and got lucky. Our island has seating on three sides. It can seat up to four people comfortably. 

Total for our kitchen including cabinets, sink, and quartz was right under $2000 which I think is an amazing deal. I ordered some black 5 inch handles from amazon. I bought 20 handles for $100 with three extra handles left. I just love the white and black color contrast of the cabinets and handles. 


Today, I was busy all day installing the handles and started tiling. I bought some simple white subway tiles since it looks great with this kitchen and price was right. I'm hoping by tomorrow afternoon I will be done with tiling. Its a small space so it shouldn't take me long. 


I can't wait to finish tiling, add toe kicks to the bottom, and thick crown molding on the top of the cabinets.  Stay tuned for updates.