Sunday, February 17, 2019

Untraditional base for shed

I'm back today to write a post about building a cheap base/foundation for a metal shed. My initial instinct was to pour a small concrete pad but after much debate I figured out a much cheaper alternative. Having a professional pour a small concrete pad would have ran us $600-800. Our shed is going to be 10x8. We purchased the shed for $320 at Lowes with a 10% off coupon. Its called Arrow galvanized steel shed for those who are interested. Its a great price for that size. 

Our previous contractor left two huge beams at our house because he ordered the wrong ones. For the longest time, I didn't know what to do with the beams. They were too big to cut down and throw away and it seemed like such a waste for such good quality beams. We ended up using them as our frame for the base. We split one beam in half lengthwise since we were missing one side. 


I understand not everyone will have huge beams laying around like us but you can easily purchase pressure treated lumber.  It will cost about $20 per a 4x4 12 footer. 

Next instead of using all gravel to fill up the base we used what we had laying around in our yard. When we built our rental addition and sunroom, the contractors pulled up so many red bricks that were used as boarders around the yard. The contractors charged to haul them away so I said leave it in my yard. We will deal with them at a later time. They sat in a pile in our yard until yesterday. 


We put all the bricks inside the frame we built for the base and headed to homedepot for some gravel.  We ended up buying only two bags of gravel for $60. While we were waiting for them to load the gravel my dad noticed some cement mix marked down for 75% off due to exposure to water and some ripped bags. We picked them all up for about $10 and headed home. We used the wheelbarrow to move all the gravel and cement to the back and inside the frame. We sprayed some water on top for the cement to mix and called it a night. We spent about 4 hours total building the frame and hauling gravel to the back. 


The next morning everything was dried and top layer cemented. I don't know if the cement would last but I used some left over garage flooring from my previous project and lined it on top. Having a solid concrete base would have been great and lasted forever but honestly, our shed is only $300. I really didn't want to spend alot of money on the base. The base we built might break down in 10-15 years but i'll still be happy I got my money's worth. 


Total spent for the base of the shed : $70. I am happy that I was able to recycle what I had laying around, cleaned up our yard and saved money at the same time. Without the bricks, I would need 4 tons of gravel to fill up the frame. I'll be building the shed by myself the next few days if it doesn't rain. I can't wait to finish it and started adding flower beds and decorations to our yard. Our yard has been severely neglected ever since we bought  the home. 


Monday, March 12, 2018

Rental unit update

Today I'm back to share more details of our first rental unit. Its near completion with some minor details that are missing. Exterior is a total disaster but I have some big plans to update the space in the near future. Lets go back to how everything started. When we first the addition/rental everything was just an empty space. I worked with the architect to design the preliminary space. I knew that space was small so I needed tall ceilings. We decided on 9 ft tall ceilings because any higher we would have to pay more.  This was how things looked after foundation, ceiling, and framing was up. 


Things started to look less raw after drywall and electrical were installed. 


Before drywall was installed, I was already befriending people at Ikea to design our future kitchen. Here was a mock up from their kitchen planner. 


After I finalized our kitchen plans, I started collecting coupons and gift cards at Ikea to save 20% on their cabinets. We ended up installing the kitchen cabinets ourselves. Our overall experience was pretty pleasant. I had my dad help install/hang the upper cabinets. Everything else, I did on my own. I think if you can assemble Ikeas furniture, you can assemble their kitchen cabinets. You tube instructions were pretty straight forward. 


After laying laminate flooring, painting the island legs, adding backsplash, and installing appliances things were starting to look more polished and presentable. Here are some current pictures.


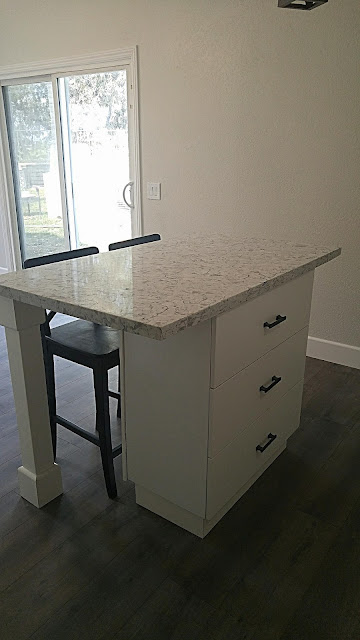
When I was designing the kitchen, Binh and I had a discussion over the kitchen island. Binh wanted a dining table and no island. I insisted on having a small kitchen island with seating options in place of a dining table. I'm glad I stuck with my original design. The island is small but can seat four people comfortably. I provided two black barstools but the tenants can add two more white backless barstools for more seating if they wanted. 


The small wine rack was a last minute decision. We had a seven inch gap that we didn't know what to do with so I stuck a wine rack in there. The trash can will be installed inside the sink cabinet. It makes everything feel a little bit fancier with a pull out trashcan and wine rack.


I ended up splurging on the appliances. I knew from the beginning I wanted a counter depth fridge and slide in range.  I know its not necessary for a rental but it just looks so much nicer. Everything is flush to the cabinets.  We nicked the dishwasher. The kitchen is quite small and we figured it will be only for a single person or couple. They can hand wash their dishes.


I still need to tile one more row underneath the microwave.


Heres a picture of the living room and front door. I had some left over paint from painting our front door so I painted the first coat of blue for this door.  I will have to paint the second coat soon.  The living room comes with a simple sofa.


We just finished installing the closet rods/shelves today and put the head board in the room. I have a dresser I plan to refinish and put in the room but that will have to wait. The bedroom will only need a queen size mattress since we are providing the bed frame and dresser.


Lastly, the unit comes with its own single car garage with direct access. The washer and dryer is located in the garage. 


Everything took us about 4.5 months to complete. We started on Oct 31st. We are not quite done yet but its ready for showings and will be ready by April 1st. Hope you guys enjoyed the mini tour and I will be back to blog about the rental back yard. 


Saturday, February 17, 2018

Ikea Kitchen

Today i'm back to share some exciting kitchen updates. I debated for a long time if I wanted to buy Ikea kitchen cabinets vs. RTA  cabinets. I currently have RTA cabinets in my kitchen and love them. I bought them from a local company and they did the installation. I only tiled the backsplash.  I've heard negative reviews from some friends that RTA cabinets in color were bad quality and the paint color comes off. I, however have white cabinets and have not had an issue with paint chipping. However, I was upgraded to their higher end cabinets by accident. The person that put in my initial quote, gave me their most expensive cabinet but I paid for the cheapest cabinets. I just got really lucky.

I ended up with Ikea cabinets instead of RTA cabinets for the rental because the budget calls for it and most importantly, ikea's 25 year warranty on their cabinets. I know Ikea is not known for long lasting quality but their warranty sounded good. Plus, all their cabinets uses the same frame, just different fronts. I figured if our renters don't take care of cabinets then I can reface them every few years. I ended buying Ikeas Haggeby white cabinets which were their most affordable option. Each front cost under $10 to replace which sounded too good to be true. We have 17 fronts so it would cost us under $170 to replace/reface.

We spent $1500 on the cabinets originally but was able to return some unused items and got back $350.  Of course I used ikea coupons and bought ikea gift cards which helped knock out 20%. If you sign up for ikeas movers coupon they give you $25 off $250. Retail me not has Ikea gift cards for 10% off. So total out of pocket for us was under $1000 for all the cabinets and a sink.  It includes a small island (30x51) and 13 feet long row of cabinets.


I got a killer deal on the quartz countertop by shopping on offer up. I found a gentlemen who fabricates quartz for a living. He was selling a remnant piece of quartz he kept from a customer. The remnant piece just happens to fit my island almost perfectly. I was initially quoted close to $2000 for the countertops from a local company. I really wanted quartz so I looked around and got lucky. Our island has seating on three sides. It can seat up to four people comfortably. 

Total for our kitchen including cabinets, sink, and quartz was right under $2000 which I think is an amazing deal. I ordered some black 5 inch handles from amazon. I bought 20 handles for $100 with three extra handles left. I just love the white and black color contrast of the cabinets and handles. 


Today, I was busy all day installing the handles and started tiling. I bought some simple white subway tiles since it looks great with this kitchen and price was right. I'm hoping by tomorrow afternoon I will be done with tiling. Its a small space so it shouldn't take me long. 


I can't wait to finish tiling, add toe kicks to the bottom, and thick crown molding on the top of the cabinets.  Stay tuned for updates. 


Monday, December 11, 2017

New addition

Today I'm back to share my latest project. I've been missing lately because of this side addition. We are adding a one bedroom, one full bathroom, living room, dining room, and full kitchen with direct single car garage access and private entrance. Its pretty much another unit but attached to our home.  Getting the plans drawn was a long and tiring process that involved going back and forth to the city multiple times but I finally got it done.

After plans were approved I started the grueling process of looking for contractors. All of the bids came in too high for me so I decided to be my own general contractor. I don't recommend anyone being their own contractor because it feels like a full time job in its own to coordinate everything but so far so good even with some hiccups.

So far we have gotten pass breaking ground, rough plumbing for bathroom and sink, pouring foundation, and framing is complete.

Below is the picture of the side of our home prior to start of the project.


The concrete contractor had to break up a block wall, relocate the pool equipment, and redo gas lines. 


Our back yard was a disaster for the longest time. Thank goodness it was outside and didn't bother us too much inside except for the noise. 


After foundation was poured everything looked so much cleaner.


After foundation, I had to hire a separate demolition contractor to remove the stucco on my wall. Stucco took two days to remove. 


Framing went up fairly quickly. Took under two weeks from start to finish even with some hiccups along the way. 


Here it is today with framing all complete. Just waiting on inspection to pass and we can start on the roofing. I have the electrician coming out on Wednesday to start while we wait for the framing inspection to pass. Hopefully it won't take too long.


The total square footage of our addition will be 490.  Cost so far for foundation and framing including all the supplies is $22K. My budget for completing the whole project is 40K. Right now, I'm right under $35K with all the other estimates in place. All the general contractors quoted me at least $50K to start and that doesn't include all the issues that we came across with gas lines and the pool equipment. I'm so excited to finally have this rental unit coming along. I will try my best to share details of everything as I go along.

Saturday, April 15, 2017

Kitchen Reveal

Happy Easter everyone. Hope everyone is enjoying their weekend. Today I want to share my kitchen makeover. When we first bought our home it came with a small dark and old kitchen.

Here are some pictures from the MLS. 


Behind the kitchen was an unpermitted bedroom right in the middle of the home. 


Fast forward many months. We had a contractor remove the unpermitted bedroom and the walls that were holding up our second floor. 


Slowly, as we started to remove all the dark cabinets and walls, things were starting to open up and look brighter.


This was the other angle after we laid new laminate flooring. 


Finally kitchen cabinets came in. 


Shortly after, quartz countertops went in. 


It took about a month for me to install all the backsplash. 


After the backsplash, the open shelves were being painted.


Finally, appliances were installed and finishing touches were added.


Total cost for a brand new kitchen 11x15 ft with 6ft x 52 inch quartz island, soft close white traditional style cabinets, carrera marble hexagon backsplash, appliances, knobs, and open shelves came out to be under $10,500. I'll do a cost breakdown in my next blog post.