Tuesday, June 18, 2013

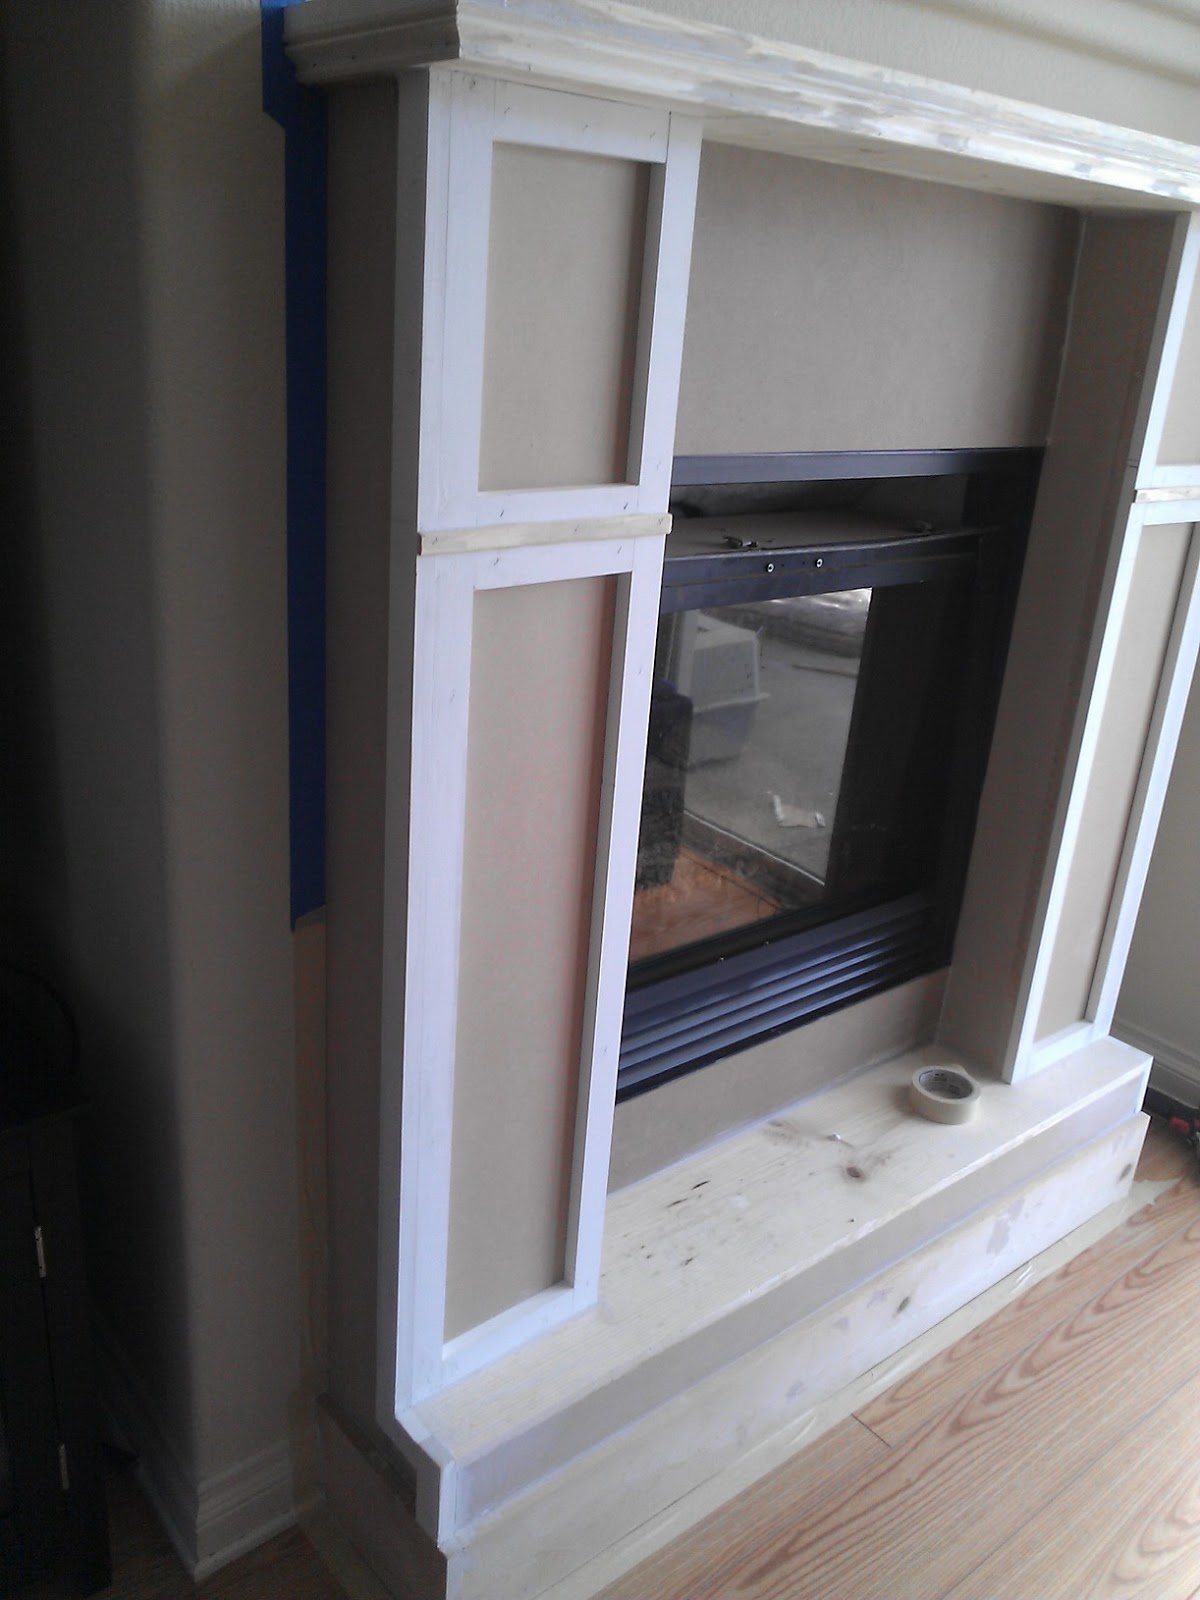
The almost complete fireplace

Supplies:

tape (painters tape or masking tape will do)
caulk (I realized that dollar tree sells them for only a dollar each. I returned the $6 caulk from Homedepot)
sand paper/block (already owned)
primer
white paint (already owned from painting the giant toy storage)
foam roller $2
paint brush (already owned)

First I caulked everything. All the edges, corners, crevices were smoothed out with caulk. I patiently waited for the caulk to dry and lightly sanded everything down with very fine sand paper. Caulking took longer then expected because I had to wait for it to dry in order to sand it down.

While waiting for everything to dry, I taped the fireplace so I can start priming/painting. I ran out of painters tape so I had to use masking tape.


After taping everything I sprayed paint the brass thing in front of my fireplace black with rust-oleums high heat spray paint. I already had this bottle laying around because I knew a long time ago that I was going to paint the brass part so I bought it and have been using it for other projects around the house. Lucky I still have a little left for the fireplace. I put a piece of paper behind the brass and between the window and just sprayed the brass black in place. The top was removed by my dad for clamping the fireplace frame so I was able to go outside to spray it black. The fireplace already looks so much better with no brass and blue grout. 


Finally I was able to start priming the whole fireplace. This is an important step for me because after the priming, I was able to see how the fireplace was really going to look. Having the frame up was nice but it was scary because I couldn't really picture the final product. 


One hour later this is how our fireplace looks. Primer is still wet. I will be back later tonight to finish the fireplace off with white paint. 


Monday, June 17, 2013

Adding trim to the fireplace

Finally after a long hiatus my dad was able to work on my fireplace.


List of supplies include:

Staple gun, air compressor, and staples- my father had all these
Six 8ft 1x2 inch trim for $2.82 each (total $18
caulk bottle $6
six feet of crown molding for $6
two feet of round trim $1


Total cost of supplies so far: $40 from building the body of the fireplace (previous post) plus trim $30 = $70


Things are looking pretty good.  My dad added 1x2 trim. The bottom I added 5.5x1 inch wood left over wood from other projects. I also bought two feet of round trim for the middle.


Now time to do the mantle part with crown molding. I'm so excited to announce that I've officially conquered 90 degree outside angle crown molding. The first time I tried to figure out how to do crown molding for basic projects, I almost broke down in tears out of frustration. In my head I thought, I'm asian, my math skills can't be that bad.. its just basic geometry and a little abstract thinking but I couldn't find the right cuts/angles for the life of me. BUT... now I've returned and have figured crown molding out after watching many youtube crown molding DIY videos. Everything is clear in my head and I know how to angle the machine. Here's a close up of the crown molding. 


I will be patching up all the nail holes and little imperfections with caulk sometime tomorrow. I decided on thinner crown molding for our fireplace since right above it will be a giant 15 feet mantle plus its cheaper to buy thinner crown molding. I will be back tomorrow with better pictures because my cellphone camera isn't the greatest with night time pictures. 

Here's a before: 


After in progress: 


Up next: patching up all the holes/cracks, spray painting all the brass into black (already done), prime, paint, and decorate. 


Saturday, June 15, 2013

All about rugs

I've had a lot of friends ask me about my rug choices and flooring options. I'm no expert on rugs but I've had my fair share of rugs. Rugs are great because you can easily change the look of your room by switching to another rug. I think the general population would vote on a soft and fluffy rug for their feet. However, living with toddler, a soft rug might not always be the best choice. When we first bought our house, I went out and bought a super soft and fluffy rug for our living room. I really loved that rug at first touch. Our Emily was a newborn when we bought our first rug. It was great. Emily loved laying on the soft rug and everyone lived in harmony with the rug. As time flew by, Emily the terrorist learned how to walk and eat snacks. Our soft and once fluffy rug has turned into a jungle filled with snack crumbs. It wasn't a good sight. Even with daily vacuuming, cleaning, and careful snack choices for Emily the rug just wasn't going to work. I eventually had to let the rug go on a very sad and gloomy day.

In my search for a new living room rug I stumbled across outdoor/indoor rugs. They are great. They come in a variety of styles and designs just like regular rugs but even more affordable. They are washable. If they ever get dirty, you literally can take them outside, hose it down with water, wait for it to dry and bring it back inside. They are meant to last for not just normal wear and tear but outdoor wear and tear. The only downside is that its not soft and fluffy.

We ended up buying an outdoor/indoor rug for our living room and I'm loving it. It was the best decision I ever made. I like the pattern/design of the rug. It was very cheap compared to other rugs its size. Our rug is 11x14 and we got it for under $200 shipped to our door from Overstock. The best part of all is that it is holding up extremely well with our Emily. It is so easy to vacuum. I literally only have to use a cheap $15 stick vacuum and it picks everything off the rug so easily. The rug is flat so its easy to vacuum or sweep clean.

Our living gets a lot of traffic. It is the main room where everyone goes to. It has our giant 18 feet long sectional so everyone goes there. The rug gets stepped on a lot. Our old soft and fluffy rug wasn't so soft and fluffy after a few months of use since we had so much traffic in the living room.


On the other side, we bought a new rug for our master bedroom. Its a soft wool rug. Its nice and fluffy and I love it. I think a soft rug will only work in an area that doesn't get much traffic such as our bedroom. So far the rug is holding up nicely. I haven't had any spills or messes on it yet. I don't vacuum it regularly either since it doesn't really get dirty.


So next time before you run out and purchase a rug make sure to consider which rug will be best for you and your family. Soft and fluffy isn't always the best choice.

**Update on fireplace and coffee table will be up by next week. I'm letting my dad rest for fathers day weekend. :)

Tuesday, June 11, 2013

The dreaded coffee table

A long time ago a friend posted about her hubby making a coffee table so I went crazy and bought a used craigslist coffee table for $20. I thought about making one myself but it was too much work for me. I've had my craigslist coffee table for a while. Its been tucked away in my garage after my dad removed the top and I added foam. I have no idea what I want to do with it. Right now we don't have a real coffee table but instead have an long leather storage ottoman with a lift/reversible top. It worked well for us when Emily was a baby because it was baby proof, great for storage, and served its purpose as a coffee table. However, it doesn't look nice and that's a problem. Below is a picture of our living room with the storage ottoman.


Here is the coffee table I purchased on craigslist for $20. Sorry the picture isn't very clear. It was the original picture from craigslist. What I love about this coffee table is that its solid wood, large 50x30x17, fits the space in my living room, cheap, and was only located two blocks away from my house.  It also has storage on the bottom. The only problem is that I needed to refinish it and make it toddler proof. Its so hard to decorate our home and make everything toddler proof without too much compromise in design. Emily is at the stage where she loves to run and bump her head on every little corner so angled wood corners are a big no no at my house. 


Here is a coffee table easily found online/in stores for over $250 with a very similar design as my $20 coffee table from Craigslist. It wouldn't be such a headache if I only had to refinish the coffee table. Now I have to somehow make it toddler proof and make it look nice.


My plan for the coffee table include refinishing the legs to a white/cream color to match my decorations and adding foam, cover with leather, add buttons, and nail head trim. I like the idea of leather on top because its easier to maintain then fabric. I'll be doing white legs with dark leather on top or maybe the other way around; light top and dark legs. 


Isn't this gorgeous? I love it. My coffee table will look similar to this because the legs will be refinished, top will be a leather instead of fabric, adding nail head trim around the bottom, and finally tufting everything with buttons. 


What do you guys think I should do? I'm still debating on the colors. Its so hard to decide. I don't want to just pick a color and not be happy with it in the future. Since I'm at a stand still with the fireplace I am doing my research on the coffee table. I've been dreading the coffee table because I have no idea what will look good. We have a patterned rug in the living room so patterned fabric will not go well. Plus fabric isn't my first choice with a toddler in the house. I don't really want to have a light top because our sofa and whole living room is light so a dark top might be my only choice. But I really like the light top with dark legs.


Monday, June 10, 2013

Inspiration for the new fireplace

I'm currently looking at possible trimmings for the fireplace. Here are some that I have been eyeing. The trimmings are simple and very affordable to imitate with plain pieces of cut wood.


Heres a before picture of another bloggers fireplace. 


Here's the almost completed version.


I can't wait to add trimmings to our fireplace tomorrow. It will look so much more complete with the trimmings. 


Building the new fireplace

My dad has been coming over to help me build the surround for our fireplace.

So far here are the list of supplies:

Premium MDF 3/4x48x96  After researching blogs from other DIY bloggers, the winner seems to be premium MDF. Its very cheap at only $34 a large piece and has a very smooth surface thats ready to be painted. Our whole fireplace only required one large piece.

Very thin MDF board $4.50 at Homedepot

Liquid nails. Special glue for granite, tile, and wood.

Gorilla glue. I guess its like super glue for wood. It came highly recommended by my dad. He had two bottles laying around in my garage.

Clamps to keep wood together once glue has been applied.

Steps:

1. Cut two pieces of MDF to the height and size that you want. My dad cut ours to be 60x10.


2. Cut two more pieces that are 4x60 and another set thats 3x60 to make a frame.  We had to cut one piece a little smaller (3x60) because we didn't remove the old tile so once placed over the old tile it doesn't sit flush. We also made a little cut on the bottom of the 4x60 piece for the baseboard.    


3. Using one piece from each size, make a frame for the sides of the fireplace using wood/gorilla glue and clamp them in place. We waited overnight for it to dry. 


 Once dried it should look like this. It should be completely flush against the wall. My dad also sanded the edges to make it smoother. You really don't need to sand the edges because I plan to add trimmings over the edges. 


The bottom should also have a small cut out for the baseboard so it will sit flush against the wall.


4. We went and bought another very thin MDF board to cover the top and bottom tiles. We decided to glue the board on the tile for now. I'm planning to make a small bump out on the very bottom thats why the thin MDF board didn't go all the way down. 


5. Cut the thin MDF to fit the top. Then cut a piece of wood/MDF for the top shelf and glue into place. At this point, I don't see anymore white tiles except the very bottom. 


6. Glue everything in place. Cut out another sheet of wood/MDF for the bump out and cut it to fit the bottom. We made our bump out to extend 4 inches from the side and 8 inches from the actual fire because thats the height and size that Emily likes to sit on. At this point the main frame of the fireplace is complete. 


Up next for the fireplace will include adding the top mantel with decorative molding that matches our kitchen cabinets, trimmings around the actual fireplace, chalking everything together so it will look nice when painted, priming the whole fireplace with Kilz primer, and finally painting everything white. 

At this point, the fireplace looks scary because its not complete. Usually when I'm in the middle of working on my projects, it will look extremely odd. Its always scary because I really don't know how my projects will turn out until the very end. My initial plan always changes because I continue to research inspirations and sometimes things just simply don't work out the way I want them.  Stay tuned for the finished fireplace. 


Sunday, June 9, 2013

Engagement party

I've been missing lately due to a very busy schedule. I haven't been able to work on the fireplace project as much as I wanted because my family has been busy with my brothers engagement party. Our family didn't have to do much because the party was hosted at my future sister in laws house. She did a wonderful job of DIY and organizing the event. Here are a few pictures taken by her friends. I will post up better quality pictures when their photographer edits them. I will not post any pictures of them due to privacy issues.


The event was based on a vintage theme. She had a chalk board displaying important dates in their relationship. It was really cute.


She had a gorgeous dessert table with the best cupcakes. I wish I would have grabbed all of the left over cupcakes. Looking back at these pictures makes me drool. They were that good. They were perfect. She also made the cutest birdcage. 


She did a fantastic decorating her parents backyard. She even hand made all the hanging decorations.


Food was delicious. They had a lot of food. I especially enjoyed the noodles/chow mien and roasted pig. 


I will be back with better quality pictures of their engagement when I get a chance. They had so many cute decorations. My brother made a vintage engagement sign that I don't have any pictures of yet. Meanwhile.. I'll be working on my fireplace. Here is a teaser.