Pages

Monday, March 12, 2018

Rental unit update

Today I'm back to share more details of our first rental unit. Its near completion with some minor details that are missing. Exterior is a total disaster but I have some big plans to update the space in the near future. Lets go back to how everything started. When we first the addition/rental everything was just an empty space. I worked with the architect to design the preliminary space. I knew that space was small so I needed tall ceilings. We decided on 9 ft tall ceilings because any higher we would have to pay more.  This was how things looked after foundation, ceiling, and framing was up. 


Things started to look less raw after drywall and electrical were installed. 


Before drywall was installed, I was already befriending people at Ikea to design our future kitchen. Here was a mock up from their kitchen planner. 


After I finalized our kitchen plans, I started collecting coupons and gift cards at Ikea to save 20% on their cabinets. We ended up installing the kitchen cabinets ourselves. Our overall experience was pretty pleasant. I had my dad help install/hang the upper cabinets. Everything else, I did on my own. I think if you can assemble Ikeas furniture, you can assemble their kitchen cabinets. You tube instructions were pretty straight forward. 


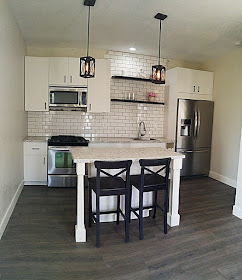
After laying laminate flooring, painting the island legs, adding backsplash, and installing appliances things were starting to look more polished and presentable. Here are some current pictures.


When I was designing the kitchen, Binh and I had a discussion over the kitchen island. Binh wanted a dining table and no island. I insisted on having a small kitchen island with seating options in place of a dining table. I'm glad I stuck with my original design. The island is small but can seat four people comfortably. I provided two black barstools but the tenants can add two more white backless barstools for more seating if they wanted. 


The small wine rack was a last minute decision. We had a seven inch gap that we didn't know what to do with so I stuck a wine rack in there. The trash can will be installed inside the sink cabinet. It makes everything feel a little bit fancier with a pull out trashcan and wine rack.


I ended up splurging on the appliances. I knew from the beginning I wanted a counter depth fridge and slide in range.  I know its not necessary for a rental but it just looks so much nicer. Everything is flush to the cabinets.  We nicked the dishwasher. The kitchen is quite small and we figured it will be only for a single person or couple. They can hand wash their dishes.


I still need to tile one more row underneath the microwave.


Heres a picture of the living room and front door. I had some left over paint from painting our front door so I painted the first coat of blue for this door.  I will have to paint the second coat soon.  The living room comes with a simple sofa.


We just finished installing the closet rods/shelves today and put the head board in the room. I have a dresser I plan to refinish and put in the room but that will have to wait. The bedroom will only need a queen size mattress since we are providing the bed frame and dresser.


Lastly, the unit comes with its own single car garage with direct access. The washer and dryer is located in the garage. 


Everything took us about 4.5 months to complete. We started on Oct 31st. We are not quite done yet but its ready for showings and will be ready by April 1st. Hope you guys enjoyed the mini tour and I will be back to blog about the rental back yard. 


Saturday, February 17, 2018

Ikea Kitchen

Today i'm back to share some exciting kitchen updates. I debated for a long time if I wanted to buy Ikea kitchen cabinets vs. RTA  cabinets. I currently have RTA cabinets in my kitchen and love them. I bought them from a local company and they did the installation. I only tiled the backsplash.  I've heard negative reviews from some friends that RTA cabinets in color were bad quality and the paint color comes off. I, however have white cabinets and have not had an issue with paint chipping. However, I was upgraded to their higher end cabinets by accident. The person that put in my initial quote, gave me their most expensive cabinet but I paid for the cheapest cabinets. I just got really lucky.

I ended up with Ikea cabinets instead of RTA cabinets for the rental because the budget calls for it and most importantly, ikea's 25 year warranty on their cabinets. I know Ikea is not known for long lasting quality but their warranty sounded good. Plus, all their cabinets uses the same frame, just different fronts. I figured if our renters don't take care of cabinets then I can reface them every few years. I ended buying Ikeas Haggeby white cabinets which were their most affordable option. Each front cost under $10 to replace which sounded too good to be true. We have 17 fronts so it would cost us under $170 to replace/reface.

We spent $1500 on the cabinets originally but was able to return some unused items and got back $350.  Of course I used ikea coupons and bought ikea gift cards which helped knock out 20%. If you sign up for ikeas movers coupon they give you $25 off $250. Retail me not has Ikea gift cards for 10% off. So total out of pocket for us was under $1000 for all the cabinets and a sink.  It includes a small island (30x51) and 13 feet long row of cabinets.


I got a killer deal on the quartz countertop by shopping on offer up. I found a gentlemen who fabricates quartz for a living. He was selling a remnant piece of quartz he kept from a customer. The remnant piece just happens to fit my island almost perfectly. I was initially quoted close to $2000 for the countertops from a local company. I really wanted quartz so I looked around and got lucky. Our island has seating on three sides. It can seat up to four people comfortably. 

Total for our kitchen including cabinets, sink, and quartz was right under $2000 which I think is an amazing deal. I ordered some black 5 inch handles from amazon. I bought 20 handles for $100 with three extra handles left. I just love the white and black color contrast of the cabinets and handles. 


Today, I was busy all day installing the handles and started tiling. I bought some simple white subway tiles since it looks great with this kitchen and price was right. I'm hoping by tomorrow afternoon I will be done with tiling. Its a small space so it shouldn't take me long. 


I can't wait to finish tiling, add toe kicks to the bottom, and thick crown molding on the top of the cabinets.  Stay tuned for updates.